
Offensive Windows IPC Internals 2: RPC
Contents:
The Series
This is part 2 of my series: Offensive Windows IPC Internals.
If you missed part one and want to take a look, you’ll find it here: Offensive Windows IPC Internals 1: Named Pipes.
Part 2 was originally planned to be about LPC & ALPC, but as it turns out it’s quite time consuming to dig out all the undocumented bits and tricks about these technologies. Therefore i made the discussion to publish my knowledge about RPC first before turning my head towards ALPC once again.
The reason why i originally planed to publish LPC & ALPC before RPC is because RPC uses ALPC under the hood when used locally and even more: RPC is the intended solution for fast local inter process communication as RPC can be instructed to process local communication via a special ALPC protocol sequence (but you’ll find that out while reading on).
Anyhow, the lesson here is (i guess) that sometimes its better to pause on a thing and get your head cleared up and make progress with something else before you get lost in something that is just not ready to reveal its mysteries to you.
Get a coffee and a comfy chair and buckle up for RPC…
Introduction
Remote Procedure Calls (RPC) is a technology to enable data communication between a client and a server across process and machine boundaries (network communication). Therefore RPC is an Inter Process Communication (IPC) technology. Other technologies in this category are for example LPC, ALPC or Named Pipes.
As the name and this category implies RPC is used to make calls to remote servers to exchange/deliver data or to trigger a remote routine. The term “remote” in this case does not describe a requirement for the communication. An RPC server does not has to be on a remote machine, and in theory does not even has to be in a different process (although this would make sense).
In theory you could implement a RPC server & client in DLLs, load them into the same process and exchange messages, but you wouldn’t gain much as the messages would still be routed through other components outside of your process (such as the kernel, but more on this later) and you would try to make use of an “Inter” Process Communication technology for “Intra” Process Communication.
Moreover a RPC server does not need to be on a remote machine, but could as well be called from a local client.
Within this blog post you can join me in discovering the insides of RPC, how it works & operates and how to implement and attack RPC clients and servers.
This post is is made from an offensive view point and tries to cover the most relevant aspects the attack surface of RPC from an attackers perspective. A more defensive geared view on RPC can for example be found at https://ipc-research.readthedocs.io/en/latest/subpages/RPC.html by Jonathan Johnson
The below post will contain some references to code from my sample implementations, all of this code can be found here:
https://github.com/csandker/InterProcessCommunication-Samples/tree/master/RPC/CPP-RPC-Client-Server
History
Microsoft’s RPC implementation is based on the RPC implementation of the Distributed Computing Environment (DCE) standard developed by the Open Software Foundation (OSF) in 1993.
“One of the key companies that contributed [to the DCE implementation] was Apollo Computer, who brought in NCA – ‘Network Computing Architecture’ which became Network Computing System (NCS) and then a major part of DCE/RPC itself”
Source: https://kganugapati.wordpress.com/tag/msrpc/
Microsoft hired Paul Leach (in 1991), one of the founding Engineers of Apollo, which might be how RPC came into Windows.
Microsoft adjusted the DCE model to fit their programming scheme, based the communication of RPC on Named Pipes and brought their implementation to daylight in Windows 95.
Back in the days you could have wondered why they based the communication on Named Pipes, because Microsoft just came up with a new technology called Local Procedure Call (LPC) in 1994 and it sounds like it would have made sense to base a technology called Remote Procedure Call on something called Local Procedure call, right?… Well yes LPC would have been the logical choice (and I would guess they initially went with LPC), but LPC had a crucial flaw: It didn’t support (and still doesn’t) asynchronous calls (more on this when i finally finish my LPC/ALPC post…), which is why Microsoft based it on Named Pipes.
As we’ll see in a moment (section RPC Protocol Sequence) when implementing routines with RPC the developer needs to tell the RPC library what ‘protocol’ to use for transportation. The original DCE/RCP standard already had defined ‘ncacn_ip_tcp’ and ‘ncadg_ip_udp’ for TCP and UDP connections. Microsoft added ‘ncacn_np’ for their implementation based on Named Pipes (transported through the SMB protocol).
RPC Messaging
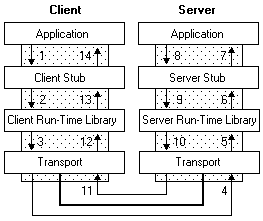
RPC is a client-server technology with messaging architecture similar to COM (Component Object Model), which on a high level consists of the following three components:
- A server & client process that are responsible for registering an RPC interface and associated binding information (more on this later on)
- Server & client stubs that are responsible for marshalling incoming and outgoing data
- The server’s & client’s RPC runtime library (rpcrt4.dll), which takes the stub data and sends them over the wire using the specified protocol (examples and details will follow)
A visual overview of this message architecture can be found at https://docs.microsoft.com/en-us/windows/win32/rpc/how-rpc-works as shown below:
Later on, in section RPC Communication Flow, i will provide an overview of the steps involved from creating an RPC server to sending a message, but before we can dive into that we need to clarify a few RPC terminology bits.
Bare with me here while we dig into the insides of RPC. The following things are essential to know in order to to get along with RPC.
If you get lost in new terms and API calls that you just can’t get in line you can always jump ahead to the RPC Communication Flow section to get an idea of where these thing belong in the communication chain.
RPC Protocol Sequence
The RPC Protocol Sequence is a constant string that defines which protocol the RPC runtime should use to transfer messages.
This string defines which RPC protocol, transport and network protocol should be used.
Microsoft supports the following three RPC protocols:
- Network Computing Architecture connection-oriented protocol (NCACN)
- Network Computing Architecture datagram protocol (NCADG)
- Network Computing Architecture local remote procedure call (NCALRPC)
In most scenarios where a connection is made across system boundaries you will find NCACN, whereas NCALRPC is recommended for local RPC communication.
The protocol sequence is a defined constant string assembled from the above parts, e.g. ncacn_ip_tcp for a connection-oriented communication based on TCP packets.
The full list of RPC protocol sequence constants can be found at: https://docs.microsoft.com/en-us/windows/win32/rpc/protocol-sequence-constants.
The most relevant protocol sequences are shown below:
| Constant/Value | Description |
|---|---|
| ncacn_ip_tcp | Connection-oriented Transmission Control Protocol/Internet Protocol (TCP/IP) |
| ncacn_http | Connection-oriented TCP/IP using Microsoft Internet Information Server as HTTP proxy |
| ncacn_np | Connection-oriented named pipes (via SMB.) |
| ncadg_ip_udp | Datagram (connectionless) User Datagram Protocol/Internet Protocol (UDP/IP) |
| ncalrpc | Local Procedure Calls (post Windows Vista via ALPC) |
RPC Interfaces
In order to establish a communication channel the RPC runtime needs to know what methods (aka. “functions”) and parameters your server offers and what data your client is sending. These information are defined in a so called “Interface”.
Side note: If you’re familiar with interfaces in COM, this is the same thing.
To get an idea of how an interface could be defined, let’s take this example from my Sample Code:
Interface1.idl
[
	// UUID: A unique identifier that distinguishes this
	// interface from other interfaces.
	uuid(9510b60a-2eac-43fc-8077-aaefbdf3752b),

	// This is version 1.0 of this interface.
	version(1.0),


	// Using an implicit handle here named hImplicitBinding:
	implicit_handle(handle_t hImplicitBinding)

]
interface Example1 // The interface is named Example1
{
	// A function that takes a zero-terminated string.
	int Output(
		[in, string] const char* pszOutput);

	void Shutdown();
}
The first thing to note is that interfaces are defined in an Interface Definition Language (IDL) file. The definitions in this will later on be compiled by the Microsoft IDL compiler (midl.exe) into header and source code files that can be used by the server and client.
The interface header is rather self explanatory with the given comments - ignore the implicit_handle instruction for now, we get into implicit and explicit handles shortly.
The body of the interface describes the methods that this interfaces exposes, their return values and their parameters. The [in, string] statement within parameter definition of the Output function is not mandatory but aids the understanding of what this parameter is used for.
Side note: You could also specify various interface attributes in an Application Configuration File (ACF). Some of these such as the type of binding (explicit vs. implicit) can be placed in the IDL file, but for more complex interfaces you might want to add an extra ACF file per interface.
RPC Binding
Once your client connects to an RPC server (we’ll get into how this is done later on) you create what Microsoft calls a “Binding”. Or to put it with Microsoft’s words:
Binding is the process of creating a logical connection between a client program and a server program. The information that composes the binding between client and server is represented by a structure called a binding handle.
The terminology of binding handles gets clearer once we put some context on it. Technically there three types of binding handles:
- Implicit
- Explicit
- Automatic
Side note: You could implement custom binding handles as described in here, but we ignore this for this post, as this is rather uncommon and you’re good with the default types.
Implicit binding handles allow your client to connect to and communicate with a specific RPC server (specified by the UUID in the IDL file). The downside is implicit bindings are not thread safe, multi-threaded applications should therefore use explicit bindings. Implicit binding handles are defined in the IDL file as shown in the sample IDL code above or in my Sample Implicit Interface.
Explicit binding handles allow your client to connect to and communicate with multiple RPC servers. Explicit binding handles are recommended to use due to being thread safe and allow for multiple connections. An example of an explicit binding handle definition can be found in my code here.
Automatic binding is a solution in between for the lazy developer, who doesn’t want to fiddle around with binding handles and let the RPC runtime figure out what is needed. My recommendation would be to use explicit handles just to be aware of what you’re doing.
Why do i need binding handles in the first place you might ask at this point.
Imagine a binding handle as a representation of your communication channel between client and server, just like the cord in a can phone (i wonder how many people know these ‘devices’…). Given that you have a representation of the communication chanel (‘the cord’) you can add attributes to this communication channel, like painting your cord to make it more unique.
Just like that binding handles allow you for example to secure the connection between your client and server (because you got something that you can add security to) and therefore form what Microsoft terms “authenticated” bindings.
Anonymous & Authenticated Bindings
Let’s say you’ve got a plain and simple RPC server running, now a client connects to your server. If you didn’t specify anything expect the bare minimum (which i will list shortly), this connection between client and server is referred to as anonymous or unauthenticated binding, due to the fact that your server got no clue who connected to it.
To avoid any client from connecting and to level up the security of your server there are three gears you can turn:
- You can set registration flags when registering your server interface; And/Or
- You can set a Security callback with a custom routine to check whether a requesting client should be allowed or denied; And/Or
- You can set authentication information associated with your binding handle to specify a security service provider and an SPN to represent your RPC server.
Let’s look at those three gears step-by-step.
Registration Flags
First of all when you create your server you need to register your interface, for example with a call to RpcServerRegisterIf2 - I’ll show you where this call comes into play in section RPC Communication Flow. As a fourth parameter to RpcServerRegisterIf2 you can specify Interface Registration Flags, such as RPC_IF_ALLOW_LOCAL_ONLY to only allow local connections.
Side note: Read this as RPC_InterFace_ALLOW_LOCAL_ONLY
A sample call could look like this:
RPC_STATUS rpcStatus = RpcServerRegisterIf2(
    Example1_v1_0_s_ifspec,         // Interface to register.
    NULL,                           // NULL type UUID
    NULL,                           // Use the MIDL generated entry-point vector.
    RPC_IF_ALLOW_LOCAL_ONLY,        // Only allow local connections
    RPC_C_LISTEN_MAX_CALLS_DEFAULT, // Use default number of concurrent calls.
    (unsigned)-1,                   // Infinite max size of incoming data blocks.
    NULL                            // No security callback.
);
Security Callbacks
Next on the list is the security callback, which you could set as the last parameter of the above call. An always-allow callback could look like this:
// Naive security callback.
RPC_STATUS CALLBACK SecurityCallback(RPC_IF_HANDLE hInterface, void* pBindingHandle)
{
	return RPC_S_OK; // Always allow anyone.
}
To include this Security callback simply set the last parameter of the RpcServerRegisterIf2 function to the name of your security callback function, which in this case is just named “SecurityCallback”, as shown below:
RPC_STATUS rpcStatus = RpcServerRegisterIf2(
    Example1_v1_0_s_ifspec,         // Interface to register.
    NULL,                           // Use the MIDL generated entry-point vector.
    NULL,                           // Use the MIDL generated entry-point vector.
    RPC_IF_ALLOW_LOCAL_ONLY,        // Only allow local connections
    RPC_C_LISTEN_MAX_CALLS_DEFAULT, // Use default number of concurrent calls.
    (unsigned)-1,                   // Infinite max size of incoming data blocks.
    SecurityCallback                // No security callback.
);
This callback function can be implemented in any way you like, you could for example allow/deny connections based on IPs.
Authenticated Bindings
Alright we’re getting closer to the end of the RPC terminology and background section… Stay with me while we dig into the last concepts.
As I can feel the pain to follow up for people who are new to all these terms, let’s take a moment to recap:
Okay so far you should know that you can create implicit and explicit interfaces and use a few Windows API calls to setup your RPC server. In the previous section I’ve added that once you register your server you can set registration flags and (if you want to) also a callback function to secure you server and filter the clients who can access your server. The last piece in the puzzle is now an extra Windows API that allows the server and client to authenticate your binding (remember that one of the benefits of having a binding handle is that you can authenticate your binding, like ‘painting your cord for your can phone’).
… But why would/should you do that?
Authenticated Bindings in combination with the right registration flag (RPC_IF_ALLOW_SECURE_ONLY) enables your RPC Server to ensure that only authenticated users can connect; And - in case the client allows it - enables the server to figure out who connected to it by impersonating the client.
To backup what you learned before: You could as well use the SecurityCallback to deny any anonymous client from connecting, but you would need to implement the filter mechanism on your own, based on attributes you control.
Example: You wouldn’t be able to determine if the client is for example a valid domain user, because you don’t have any access to these account information.
Okay so how do you specify an authenticated binding?
You can authenticate your binding on the server and on the client side. On the server side you want to implement this to ensure a secured connection and on the client side you might need to have this in order to be able to connect to your server (as we’ll see shortly in the Access Matrix)
Authenticating the binding on the Server side: [Taken from my example code here]
RPC_STATUS rpcStatus = RpcServerRegisterAuthInfo(
    pszSpn,             // Server principal name
    RPC_C_AUTHN_WINNT,	// using NTLM as authentication service provider
    NULL,               // Use default key function, which  is ignored for NTLM SSP
    NULL                // No arg for key function
);
Authenticating the binding on the client side: [Taken from my example code here]
RPC_STATUS status = RpcBindingSetAuthInfoEx(
    hExplicitBinding,		// the client's binding handle
    pszHostSPN,			// the server's service principale name (SPN)
    RPC_C_AUTHN_LEVEL_PKT,	// authentication level PKT
    RPC_C_AUTHN_WINNT,		// using NTLM as authentication service provider
    NULL,			// use current thread credentials
    RPC_C_AUTHZ_NAME,		// authorization based on the provided SPN
    &secQos			// Quality of Service structure
);
The interesting bit on the client side is that you can set a Quality of Service (QOS) structure with your authenticated binding handle. This QOS structure can for example be used on the client side to determine the Impersonation Level (for background information check out my previous IPC post ), which we’ll later cover in section Client Impersonation.
Important to note:
Setting an authenticated binding on the server side, does not enforce an authentication on the client side.
If for example no flags are set on the server side or only the RPC_IF_ALLOW_CALLBACKS_WITH_NO_AUTH is set, unauthenticated clients can still connect to the RPC server.
Setting the RPC_IF_ALLOW_SECURE_ONLY flag however prevents unauthenticated client bindings, because the client can’t set an authentication level (which is what is checked with this flag) without creating an authenticated binding.
Well-known vs Dynamic Endpoints
Last but not least we have to clarify one last important aspect of RPC communication: Well-known vs Dynamic endpoints.
I’ll try to make this one short as it’s also quite easy to understand…
When you spin up your RPC server, the server registers an interface (as we’ve seen already in the code sample above with RpcServerRegisterIf2) and it also needs to define on which protocol sequence (e.g. ‘ncacn_ip_tcp’, ‘ncacn_np’, …) it wants to listen to.
Now the protocol sequence string that you specify in your server is not quite enough to open a RPC port connection. Imagine you specify ‘ncacn_ip_tcp’ as your protocol sequence, meaning you instruct your server to open up an RPC connection that accepts connections via TCP/IP… but … on which TCP port should the server actually open up a connection?
Similar to ncacn_ip_tcp other protocol sequences also need a little more information about where to open a connection object:
- ncacn_ip_tcp needs a TCP port number, e.g. 9999
- ncacn_np needs a Named Pipe name, e .g. “\pipe\FRPC-NP”
- ncalrpc needs an ALPC port name, e.g. “\RPC Control\FRPC-LRPC”
Let’s assume for a moment you specified ncacn_np as the protocol sequence and chose the Named Pipe name to be “\pipe\FRPC-NP”.
Your RPC server will happily spin up and is now waiting for clients to connect. The client on the other hand needs to know where it should connect to. You tell your client the server’s name, specify the protocol sequence to be ncacn_np and set the Named Pipe name to the same name you defined in your server (“\pipe\FRPC-NP”). The client connects successfully and just like that you’ve built a RPC client and server based on a Well-known endpoint… which in this case is: “\pipe\FRPC-NP”.
Using Well-known RPC endpoints just means you know all the binding information (protocol sequence and endpoint-address) upfront and could - if you want to - also hardcode those information in your client and server. Using Well-known endpoints is the easiest way to build up your first RPC client/server connection.
What are Dynamic endpoints then and why should one use them?
In the example above we choose ncacn_np and just picked any arbitrary Named Pipe name to open our server and that worked just fine, because we knew (well at least we hoped) the Named Pipe that we’ve opened up with this name didn’t already exist on the server side, because we just made a name up. If we now choose ncacn_ip_tcp to be the protocol sequence how do we know which TCP port is still available for us? Well we could just specify that our program needs port 9999 to be functional and leave it to the Admins to ensure that this port is unused, but we could also ask Windows to assign us a port that is free. And that is what Dynamic endpoints are. Easy … case closed, let’s go for beers
Wait a minute: If we get assigned a port dynamically, how does the client know where to connect to ?!…
And that is the other thing with Dynamic endpoints: If you chose dynamic endpoints you need someone to tell your client what port you got and that someone is the RPC Endpoint Mapper service (started and running by default on your Windows system). If your server is using Dynamic Endpoints
it will need to call the RPC Endpoint Mapper to tell it to register its Interface and functions (specified in the IDL file). Once the client attempts to create the binding it will query the server’s RPC Endpoint Mapper for matching interfaces and the Endpoint Mapper will fill in the missing information (e.g. the TCP port) to create the binding.
The main advantage of Dynamic Endpoints is to automatically find an available endpoint-address when the endpoint-address space is limited, as it is the case with TCP ports. Named Pipes and ALPC based connections can also safely be done with Well-known endpoints, because the address space (aka. the arbitrary pipe or port name that you’ve chosen) is large enough to avoid collisions.
We’ll wrap this up with code snippets from the server side to nail our understanding of Well-known and Dynamic endpoints.
Well-Known Endpoint Implementation
RPC_STATUS rpcStatus;
// Create Binding Information
rpcStatus = RpcServerUseProtseqEp(
    (RPC_WSTR)L"ncacn_np",          // using Named Pipes here
    RPC_C_PROTSEQ_MAX_REQS_DEFAULT, // Ignored for Named Pipes (only used for ncacn_ip_tcp, but set this anyway)
    (RPC_WSTR)L"\\pipe\\FRPC-NP",   // example Named Pipe name
    NULL                            // No Secuirty Descriptor
);
// Register Interface
rpcStatus = RpcServerRegisterIf2(...) // As shown in the examples above
// OPTIONAL: Register Authentication Information
rpcStatus = RpcServerRegisterAuthInfo(...) // As shown in the example above
// Listen for incoming client connections
rpcStatus = RpcServerListen(
    1,                              // Recommended minimum number of threads.
    RPC_C_LISTEN_MAX_CALLS_DEFAULT, // Recommended maximum number of threads.
    FALSE                           // Start listening now.
);
Dynamic Endpoint Implementation
RPC_STATUS rpcStatus;
RPC_BINDING_VECTOR* pbindingVector = 0;
// Create Binding Information
rpcStatus = RpcServerUseProtseq(
    (RPC_WSTR)L"ncacn_ip_tcp",      // using Named Pipes here
    RPC_C_PROTSEQ_MAX_REQS_DEFAULT, // Backlog queue length for the ncacn_ip_tcp protocol sequenc
    NULL                            // No Secuirty Descriptor
);
// Register Interface
rpcStatus = RpcServerRegisterIf2(...) // As shown in the examples above
// OPTIONAL: Register Authentication Information
rpcStatus = RpcServerRegisterAuthInfo(...) // As shown in the example above
// Get Binding vectors (dynamically assigend)
rpcStatus = RpcServerInqBindings(&pbindingVector);
// Register with RPC Endpoint Mapper
rpcStatus = RpcEpRegister(
    Example1_v1_0_s_ifspec,             // your interface as defined via IDL
    pbindingVector,                     // your dynamic binding vectors
    0,                                  // We don't want to register the vectors with UUIDs
    (RPC_WSTR)L"MyDyamicEndpointServer" // Annotation used for information purposes only, max 64 characters
);
// Listen for incoming client connections
rpcStatus = RpcServerListen(
    1,                              // Recommended minimum number of threads.
    RPC_C_LISTEN_MAX_CALLS_DEFAULT, // Recommended maximum number of threads.
    FALSE                           // Start listening now.
);
Note: If you’re using Well-known endpoints you could as well register your RPC server with your local RPC Endpoint Mapper by calling RpcServerInqBindings & RpcEpRegister if you want to. You don’t need to do that for your client to be able to connect, but you could.
If you want to read more on this, the Microsoft documentation on this topic can be found here:
https://docs.microsoft.com/en-us/windows/win32/rpc/specifying-endpoints
RPC Communication Flow
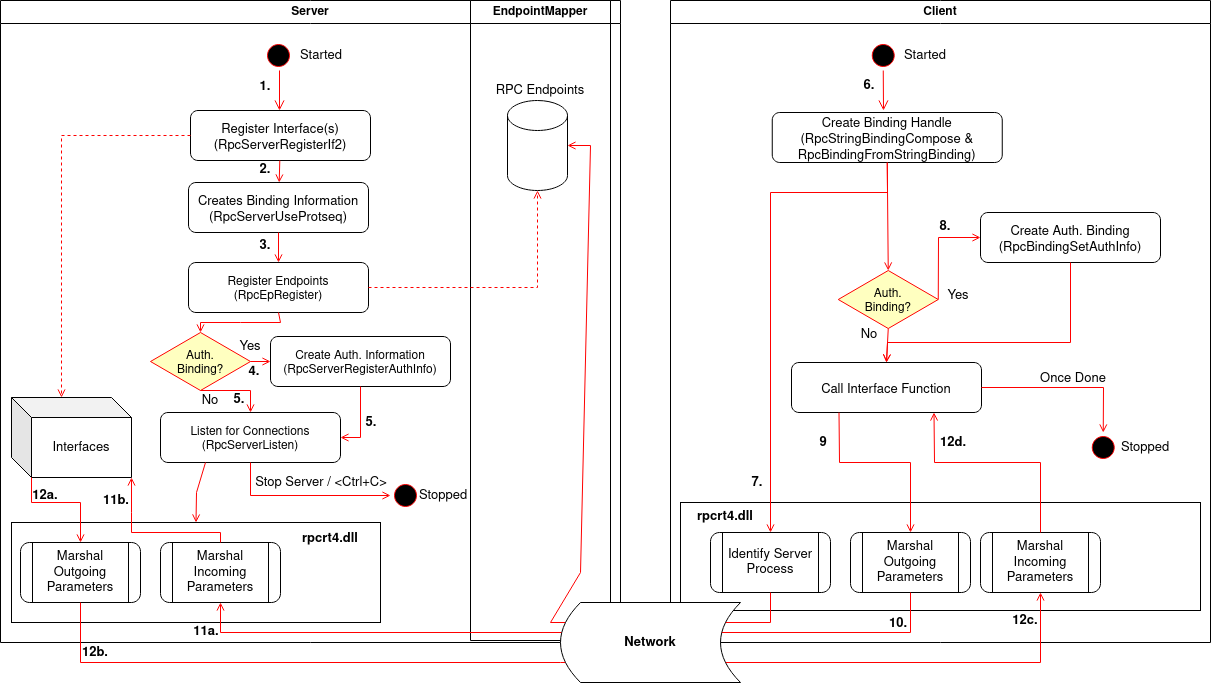
To wrap up all of the above, the communication flow can be summarized as follows:
- Server registers Interface(s), e.g. using RpcServerRegisterIf2
- Server creates Binding Information using RpcServerUseProtseq & RpcServerInqBindings (RpcServerInqBindings is optional for Well-known Endpoints)
- Server registers Endpoints using RpcEpRegister (optional for Well-known Endpoints)
- Server can register Authentication Information using RpcServerRegisterAuthInfo (optional)
- Server listens for client connection(s) using RpcServerListen
- Client creates a Binding Handle, using RpcStringBindingCompose & RpcBindingFromStringBinding
- Client RPC runtime library finds the server process by querying the Endpoint Mapper on the server host system (only necessary for Dynamic Endpoints)
- Client can authenticate binding handle using RpcBindingSetAuthInfo (optional)
- Client makes an RPC call by calling one of the functions defined in the used interface
- Client RPC runtime library marshals the arguments in an NDR format with the help of the NDR runtime and send them to the server,
- The Server’s RPC run time library gives the marshaled arguments to the stub, which unmarshals them, and then passes them to the server routines.
- When the Server routines return, the stub picks up the [out] and [in, out] parameters (defined in the interface IDL file) and the return value, marshals them, and sends the marshaled data to the Server’s RPC run time library, which transfers them back to the client.
Sample Implementation
As mentioned in the beginning the examples above are taken from my sample implementation, publicly available at:
https://github.com/csandker/InterProcessCommunication-Samples/tree/master/RPC/CPP-RPC-Client-Server.
In this repo you will find the following sample implementations:
- Basic unauthenticated Server supporting unauthenticated Implicit Bindings
- Basic unauthenticated Client supporting unauthenticated Implicit Bindings
- Basic Server supporting unauthenticated Explicit Bindings
- Basic Server supporting authenticated Explicit Bindings
- Basic Client supporting authenticated Explicit Bindings without QOS
- Basic Client supporting authenticated Explicit Bindings with QOS
An example how these PoCs look can be seen below:

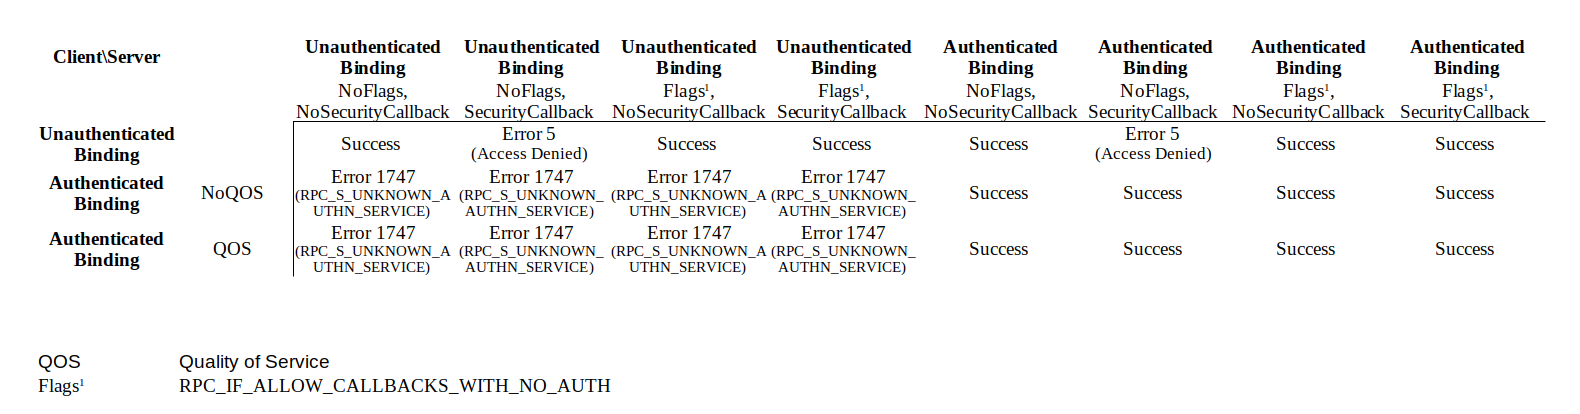
Access Matrix
Alright if you understood all of the terminology above, here’s the access matrix that visualizes which client can connect to which server.
Note: You can only connect an implicit clients to implicit servers, and explicit clients to explicit servers. Otherwise you get an Error 1717 (RPC_S_UNKNOWN_IF)
Attack Surface
Finally… after all that talk about RPC internals, let’s talk about RPC’s attack surface.
Obviously there could be bugs and 0-days anywhere in the RPC communication chain, which always comes down to a case-by-case analysis to understand its exploit potentials, but there is also some exploitation potential of general RPC design concepts, which I’ll highlight below.
Side note: If you are aware of interesting RPC CVEs, ping me at /0xcsandker
Finding Interesting Targets
Okay so before we can think what offensive games we can play with RPC, we need to find suitable targets first.
Let’s dive into how we can find RPC Servers and clients on your systems.
RPC Servers
To recap a server is built by specify the required information (protocol sequence & endpoint-address) and calling Windows APIs to built the necessary internal objects and start the server. With that in mind the easiest way to find RPC servers on your local system is by looking for programs that import those RPC Windows APIs.
One easy way to do that is by using the DumpBin utility that nowadays ships with Visual Studio.
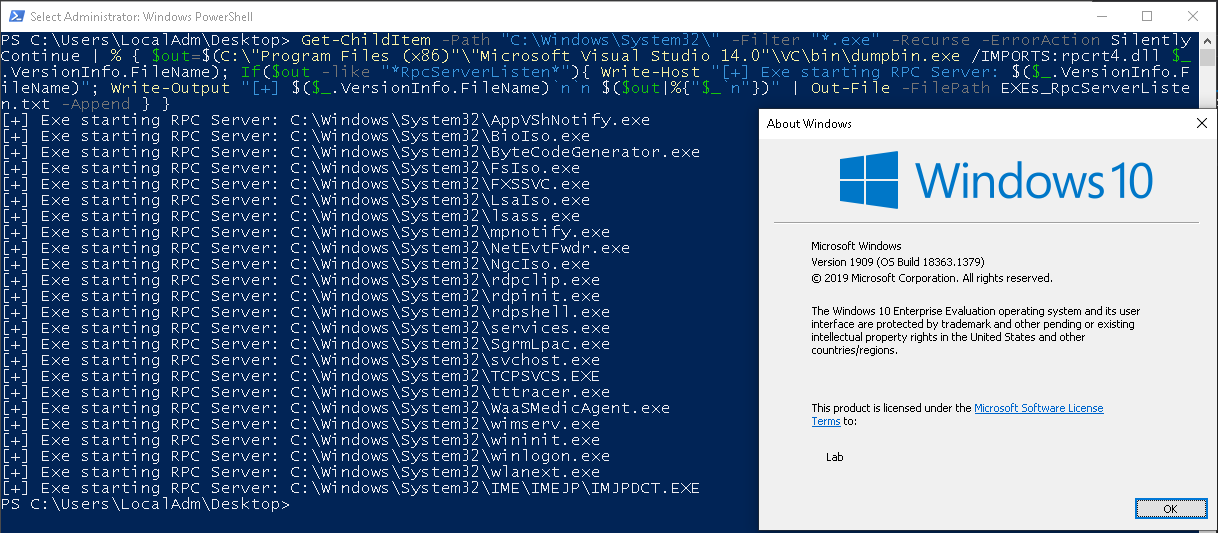
A sample Powershell snippet searching through C:\Windows\System32\ on a recent Windows10 can be found below:
Get-ChildItem -Path "C:\Windows\System32\" -Filter "*.exe" -Recurse -ErrorAction SilentlyContinue | % { $out=$(C:\"Program Files (x86)"\"Microsoft Visual Studio 14.0"\VC\bin\dumpbin.exe /IMPORTS:rpcrt4.dll $_.VersionInfo.FileName); If($out -like "*RpcServerListen*"){ Write-Host "[+] Exe starting RPC Server: $($_.VersionInfo.FileName)"; Write-Output "[+] $($_.VersionInfo.FileName)`n`n $($out|%{"$_`n"})" | Out-File -FilePath EXEs_RpcServerListen.txt -Append } }
This snippet prints the names of the executables to console and the entire DumpBin output to the file EXEs_RpcServerListen.txt (so that you can review what DumpBin actually gives you).
Another way to find interesting RPC servers is by querying the RPC Endpoint Mapper, either locally or on any remote system.
Microsoft has a test utility called PortQry to do that (there is also a GUI version of that tool available) that you can use like this: C:\PortQryV2\PortQry.exe -n <HostName> -e 135
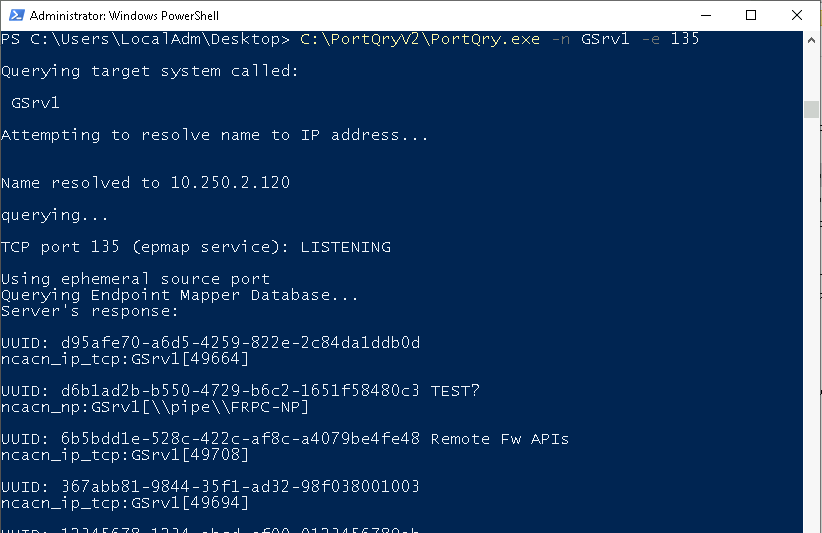
This tool gives you some information about remote RPC interfaces that the Endpoint Mapper knows about (remember that Well-known Endpoints do not have to inform the Endpoint Mapper about their interfaces).
Another option is to query the Endpoint Manager directly by calling RpcMgmtEpEltInqBegin and iterating over the interfaces via RpcMgmtEpEltInqNext. A sample implementation, named RPCDump, of this approach was included in Chris McNab’s amazing book ‘Network Security Assessment’, O’Reilly published the tool written in C here (according to the comment annotation credits for this code should go to Todd Sabin).
I have ported this cool tool to VC++ and made some slight usability changes. I’ve published my fork at https://github.com/csandker/RPCDump.
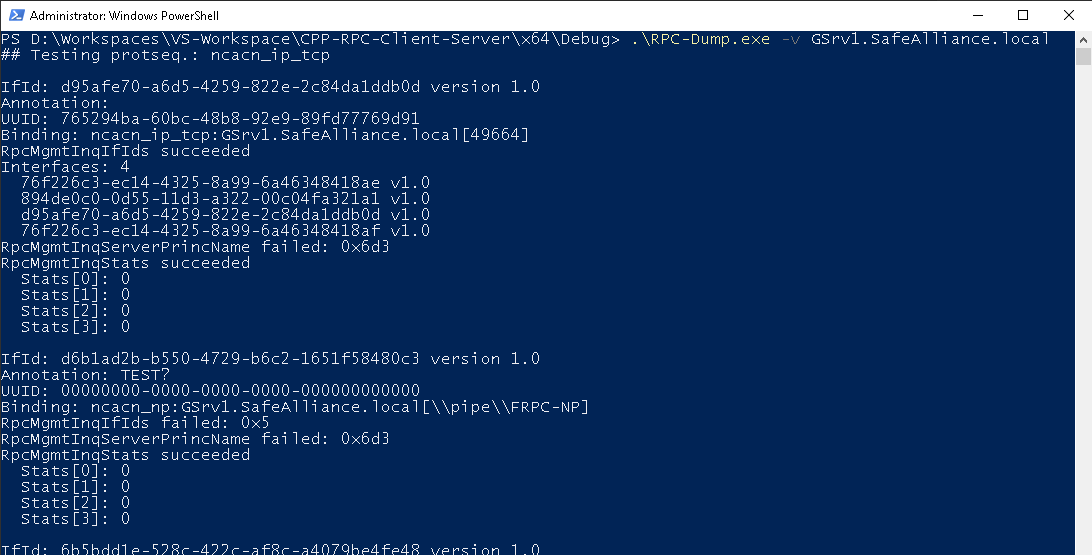
As shown this tool also list the interfaces of the found RPC endpoints, along with some other information. I won’t go into the details of all these fields, but if you’re interested check out the code and read along the Windows API documentation. The stats for example are retrieved by a call to RpcMgmtInqStats, where the values returned are referenced in the Remarks section.
Once again remember that there are only the RPC interfaces that are registered with the target’s Endpoint Mapper.
RPC Clients
Finding clients that connect to remote or local RPC servers might also be an interesting target.
There is no single authority that is aware of which RPC clients are currently running, therefore you’re down to two options for finding clients:
- Finding executables/Processes that use client RPC APIs; Or
- Caught clients in the act
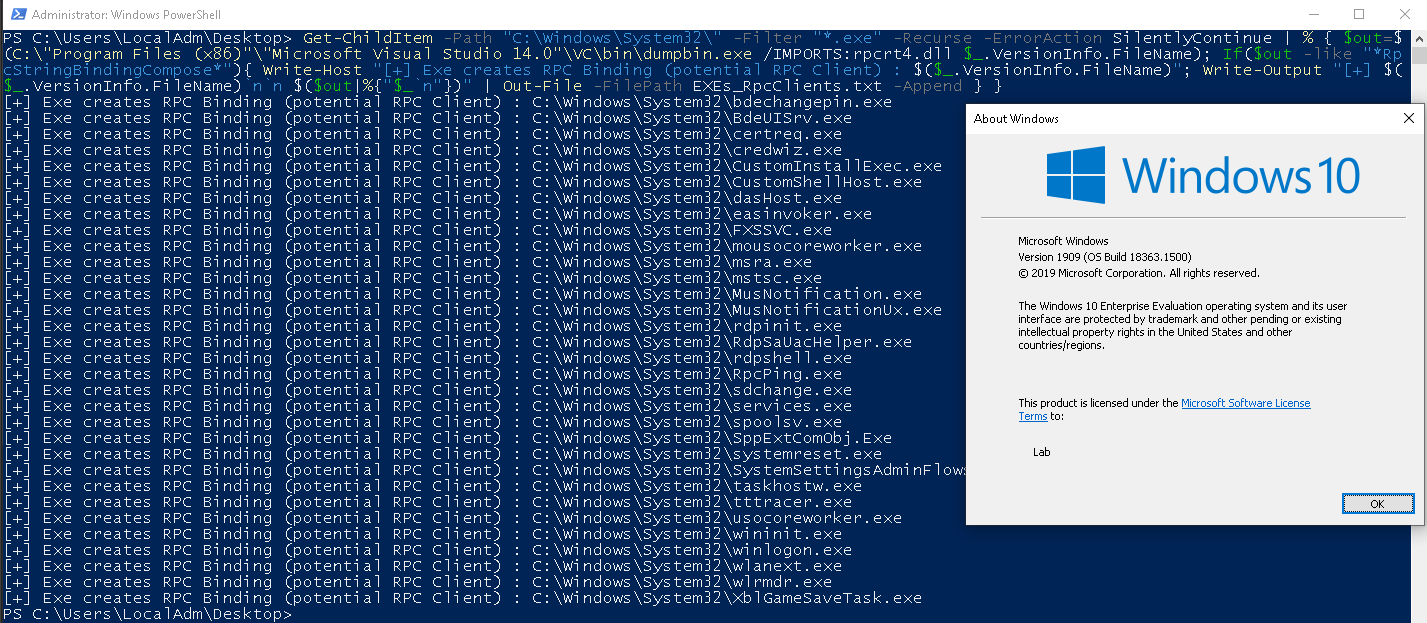
Finding local executables that import client RPC API is analogous to what we already did to find servers with DumpBin. A good Windows API to look for is RpcStringBindingCompose:
Get-ChildItem -Path "C:\Windows\System32\" -Filter "*.exe" -Recurse -ErrorAction SilentlyContinue | % { $out=$(C:\"Program Files (x86)"\"Microsoft Visual Studio 14.0"\VC\bin\dumpbin.exe /IMPORTS:rpcrt4.dll $_.VersionInfo.FileName); If($out -like "*RpcStringBindingCompose*"){ Write-Host "[+] Exe creates RPC Binding (potential RPC Client) : $($_.VersionInfo.FileName)"; Write-Output "[+] $($_.VersionInfo.FileName)`n`n $($out|%{"$_`n"})" | Out-File -FilePath EXEs_RpcClients.txt -Append } }
The other option to find RPC clients is by spotting them while they’re connection to their target. One example of how clients can be spotted is by inspecting the traffic that is sent over the wire between two systems. Wireshark has a ‘DCERPC’ filter that can be used to spot connections.
An example of a client connecting to a server is shown below:
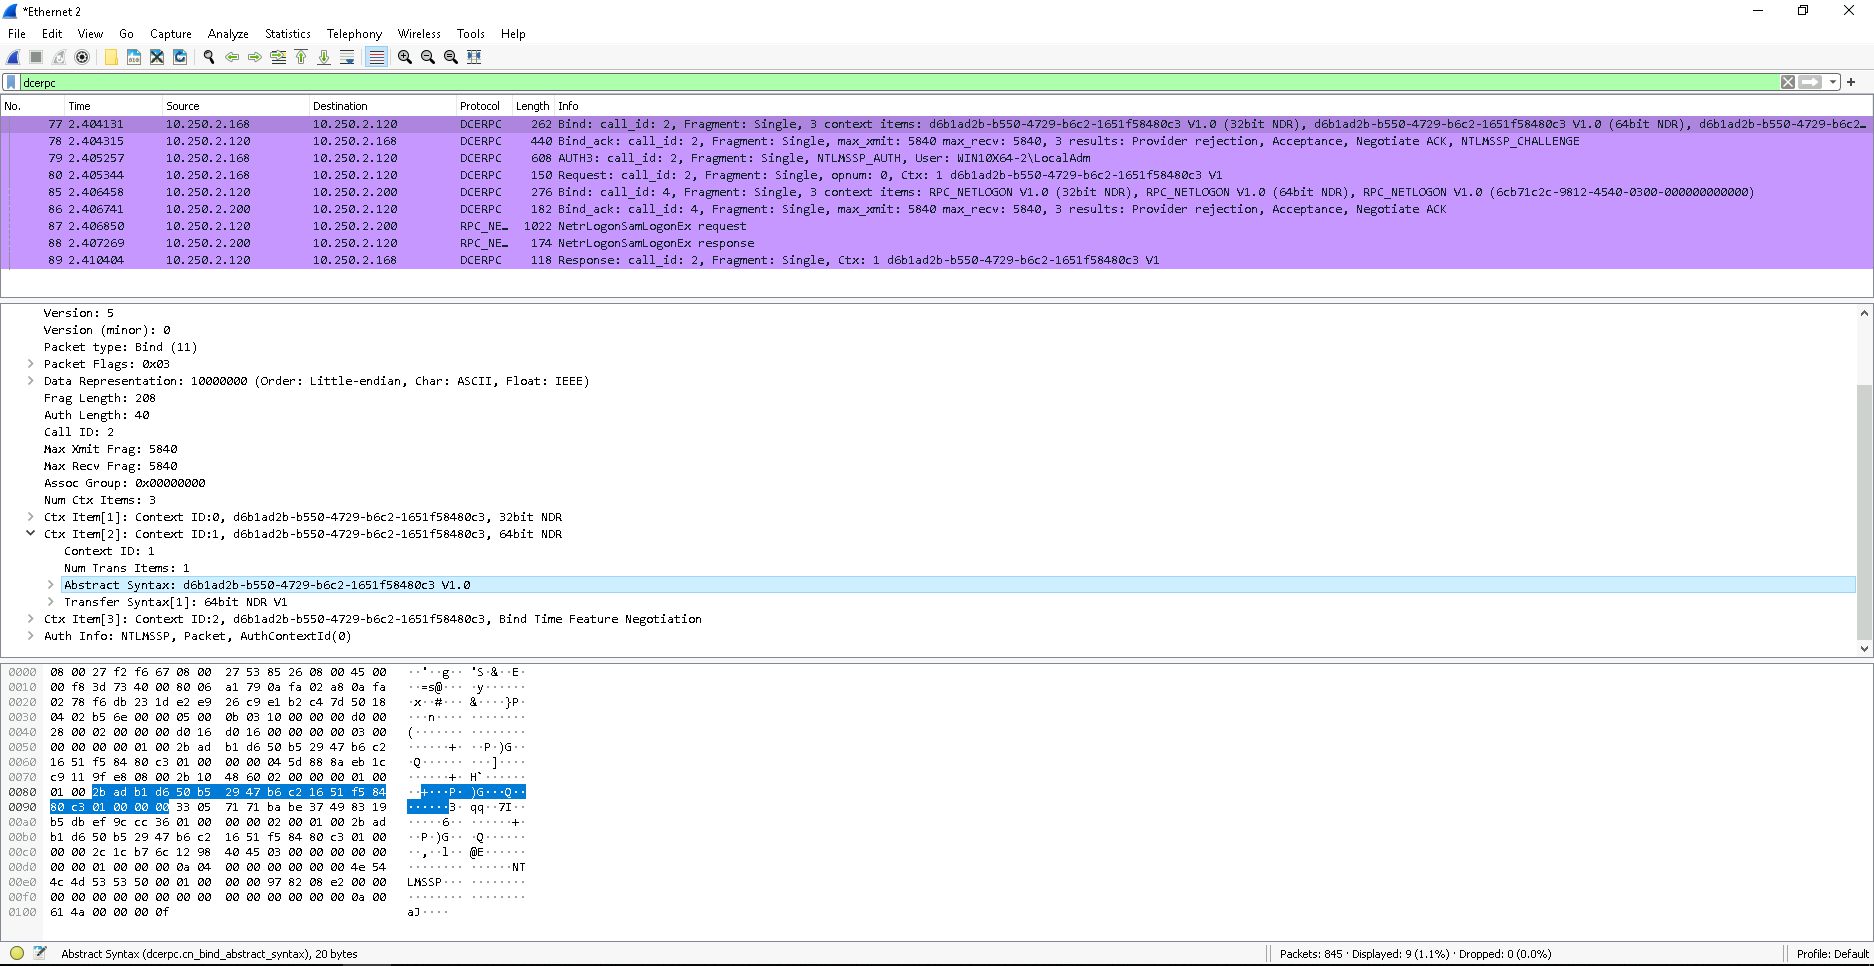
The bind request is one of the things we can look for to identify clients. In the select package we can see a client trying to bind to a server interface with the UUID of “d6b1ad2b-b550-4729-b6c2-1651f58480c3”.
Unauthorized Access
Once you identified an RPC server that exposes interesting functionality that could be useful to your attack chain the most obvious thing to check is if you can access the server unauthorized.
You could either implement your own client, e.g. based on the my Sample Implementation, or refer to the Access Matrix to check if your client can connect to the server.
If you already got heads deep into reverse engineering the RPC server and found that the server sets authentication information by calling RpcServerRegisterAuthInfo with its SPN and a specified Service Provider, be reminded that an authenticated server binding does not enforce the client to use an authenticated binding. In other words: Just because the server sets authentication information does not mean the client needs to connect through an authenticated binding. Moreover when connecting to a server that sets authentication information be aware that client calls with invalid credentials will not be dispatched by the run time library (rpcrt4.dll), however, client calls with no credentials will be dispatched. Or to put it with Microsoft words:
Remember that, by default, security is optional
Source: https://docs.microsoft.com/en-us/windows/win32/api/rpcdce/nf-rpcdce-rpcserverregisterifex
Once you are connected to a server the question of “what to do next?” arises…
Well you’re then in a position to call interface functions, the bad news is: You need to identify the function names and parameters first, which comes down to reverse engineering your target server.
If you’re lucking and you’re not looking at a pure RPC server, but a COM server (COM, especially DCOM, uses RPC under the hood) the server might come with a Type Library (.tlb) that you could use to lookup interface functions.
I won’t go any deeper into type libraries or anything else here (the blog post is quite long already), but my general recommendation for someone in this situation would be: Take my sample RPC client and server code, compile it and start your reverse engineering journey with sample code you know. In that particular case, let me add another clue: My sample interface has an “Output” function defined in the IDL file, this “Output” function begins with the print statement printf("[~] Client Message: %s\n", pszOutput);, you could for example start by searching for the substring [~] Client Message to figure out where this particular interface function is.
Client Impersonation
Client impersonation also provides interesting attack surface. I’ve already put some light on what Impersonation is and how it works in the last part of the series, if you missed that and need a fresh up on Impersonation you will find that bit explained in the Impersonation Section of my last post.
The recipe for impersonating a client is as follows:
- You need a RPC client connecting to your server
- The client must use an authenticated binding (otherwise there would be no security information you could impersonate)
- The client must not set the Impersonation Level authenticated binding below SecurityImpersonation
- … that’s it
The process of impersonation is as easy as:
- Calling RpcImpersonateClient from within your server interface function
Note that this function takes the binding handle as input, therefore you need a Explicit binding server to use impersonation (which makes sense) - If that call succeeds, the server’s thread context is changed to the client’s security context and you can call GetCurrentThread & OpenThreadToken to receive the client’s Impersonation token.
If you’re now like ‘WTF security context change?!’ you will find answers in the IPC Named Pipe post
if you’re more like ‘WTF Impersonation token?!’ you will find answers in my Windows Authorization Guide - Once you’ve called DuplicateTokenEx to turn your Impersonation token into a primary token, you can happily return to your original server thread context by calling RpcRevertToSelfEx
- And finally you can call CreateProcessWithTokenW to create a new process with the client’s token.
Please note that this is only one way to create a process with the client’s token, but in my eyes it pictures the way of doing these things pretty well and therefore i use this approach here. A sample implementation of this code can be found here.
This is by the way the same procedure i used for impersonating Named Pipe clients in my last post.
As said in the recipe steps above, you just need a client that connects to your server and that client must use an authenticated binding.
If the client does not authenticate its binding that the call to RpcImpersonateClient will result in Error 1764 (RPC_S_BINDING_HAS_NO_AUTH).
Finding a suitable client that you can make connect to your server comes down to finding a RPC client (see section Finding RPC Clients) and finding one that you can make connect to your server. Well the later might be the tricky part in this exploit chain and I can’t give general recommendation here on how to find those connections. One reason for that is because it depends on the protocol sequence used by the client, where an unanswered TCP call might be best detectable when sniffing on the wire where an unanswered Named Pipe connection attempt could also be spotted on the client’s or server’s host system.
In the 1st part of the series (which was about Named Pipes) I pulled a bigger spotlight on client impersonation, therefore i will safe myself a few words here. However, if you haven’t already done it I would recommend reading up on Instance Creation Race Conditions and also Instance Creation Special Flavors. The same principals apply here.
The more interesting aspect is that I intentionally wrote above: “The client must not set the Impersonation Level authenticated binding below SecurityImpersonation* … which sounds kinda like an opt-out process and that’s exactly what it is.
Remember that you can set the Quality of Service (QOS) structure on the client side when creating an authenticated binding? As said back in section Authenticated Bindings you can use that structure to determine the Impersonation Level when connecting to the server. Interestingly if you don’t set any QOS structure the default will be SecurityImpersonation, which allows any server to impersonate an RPC client as long as the client does not set the Impersonation Level explicitly below SecurityImpersonation.
The result of an impersonation could then look like this:
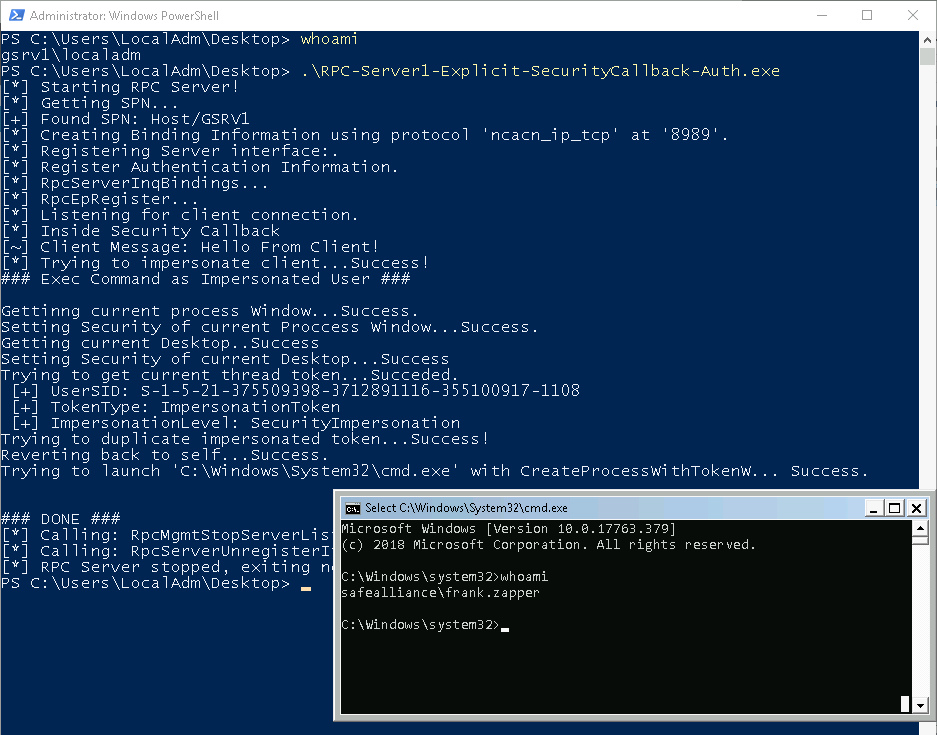
Server Non-Impersonation
There is another side of impersonation that is often missed, but is not less interesting from an attackers perspective.
In part 1 of the series i detailed the steps that are involved when impersonating a client, these equally apply also for RPC impersonations (and in all other similar technologies), where the following two steps are especially interesting:
>> Step 8: The server’s thread context is then changed to the client’s security context.
>> Step 9: Any action the server takes and any function the server calls while in the security context of the client are made with the identify of the client and thereby impersonating the client.
Source: Offensive Windows IPC Internals 1: Named Pipes
The server’s thread context is changed and all actions then made are made with the security context of the client. In the above section (and in my sample code) I used that to grab the current thread token, which then is the client’s token and transform that into a primary token to launch a new process with that token. I could as well just called any action i want to do directly, because I’m all ready operating in the client’s security context. Based on the section title you might already guess now where this is heading… what if the impersonation fails and the server does not check for that?
The call to RpcImpersonateClient, the API function that does all the impersonation magic for you, returns the status of the impersonation operation and it is crucial for the server to check that.
If the impersonation is successful you’re inside the client’s security context afterwards, but if it fails you’re in the same old security context from where you called the RpcImpersonateClient.
Now a RPC server is likely to run as another user (often also in a higher security context) and in those cases it might try to impersonate its clients to run client operations in a lower, presumably safer client security context. As an attacker you could use those cases for privilege escalation attack vectors by forcing a failing impersonation attempt on the server side and therefore causing the server to execute client operating in the higher security context of the server.
The recipe for this attack scenario is simple:
- You need a server that impersonates its clients and does not carefully check the return status of RpcImpersonateClient before executing further actions.
- The action taken by the server after an impersonation attempt must be exploitable from your client’s perspective.
- You need to force the impersonation attempt to fail.
Finding a local server that tries to impersonate a client is a simple task if you read the previous sections and took note of how to use DumpBin.
Finding a server that runs actions in a ‘assumed impersonated’ context which can be used from an attackers perspective is pretty much a creative case-by-case analysis of what the server does. The best advise to analyze those cases is to think outside the box and potentially be prepared to chain multiple events and actions. A rather simple but powerful example could be a file operation conducted by the server; Maybe you could use junctions to create a file in a write protected system path or maybe you could cause the server to open a Named Pipe instead of a file and then use Named Pipe Impersonation to impersonate the server…
Last on the checklist is causing the server’s impersonation attempt to fail and that’s the easiest part of the job. There are two ways to achieve this:
- You could connect from an unauthenticated binding; Or
- You could connect from an authenticated binding and set the Impersonation Level of the QOS structure to SecurityAnonymous
Either of this actions will safely cause a failed impersonation attempt.
This technique is by the way not a new thing, it’s widely known… just forgotten sometimes. Maybe there also is a more fancy name out there for this technique that i haven’t come across yet. Microsoft even especially reminds you of this in the Remarks section (they even gave this a special ‘Securtiy Remarks’ heading) of the RpcImpersonateClient function:
If the call to RpcImpersonateClient fails for any reason, the client connection is not impersonated and the client request is made in the security context of the process. If the process is running as a highly privileged account, such as LocalSystem, or as a member of an administrative group, the user may be able to perform actions they would otherwise be disallowed. Therefore it is important to always check the return value of the call, and if it fails, raise an error; do not continue execution of the client request.
Source: RpcImpersonateClient: Security Remarks
MITM Authenticated NTLM Connections
The last two sections cover the fact that RPC can be used as a remote networking communication technology and therefore also comes with an interesting attack surface on the network side.
Side Note: I intentionally phrased it this way; Your initially though might have been “Dooough what else do you gonna use a technology called Remote Procedure Call for?!” … But in fact RPC is very well also intended to be used purely locally as a wrapper for ALPC (i get back to this in part 3 of the series once i figured out all the mysteries of ALPC).
Anyhow, if you’re using RPC over the wire and you want your binding to be authenticated you will need a network protocol that does the authentication for you. That’s why the second parameter (AuthnSvc) of the RpcServerRegisterAuthInfo, which is the API function you’d call on the server side to create an authenticated binding, let’s you define which authentication service you would like to use. You could for example specify Kerberos with the constant value of RPC_C_AUTHN_GSS_KERBEROS, or you could specify RPC_C_AUTHN_DEFAULT to use the default authentication service, which is - interestingly enough - NTLM (RPC_C_AUTHN_WINNT).
Kerberos was set to be the default authentication scheme since Windows 2000, but RPC still defaults to NTLM.
So if you’re in suitable position on the network and see a NTLM connection coming by there are two interesting things you could do with that:
- You could grab the NTLM(v2) challenge response hash off the wire and offline brute-force the user’s password; And/Or
- You could intercept and relay the NTLM connection to gain access to another system.
I don’t want to deep dive into those two topics (if you made it until here you sure have read enough already), so I’ll add just two remarks here:
- NTLM(v2) challenge brute-forcing is very well known, so you should not have trouble finding how to do that. Check out hashcat mode 5600 on https://hashcat.net/wiki/doku.php?id=example_hashes for an example.
- NTLM Relay is very well described by the great Pixis at https://en.hackndo.com/ntlm-relay/. There are a few things to be aware of depending on the protocol used so make sure you check out that post if you’re interested.
MITM Authenticated GSS_NEGOTIATE Connections
Last but not least… you nearly made it through this post.
Next to NTLM based network authentication schemes, which is what you get if you chose RPC_C_AUTHN_WINNT or RPC_C_AUTHN_DEFAULT as the authentication service in your RpcServerRegisterAuthInfo call, the very often used RPC_C_AUTHN_GSS_NEGOTIATE constant is also an interesting target.
If RPC_C_AUTHN_GSS_NEGOTIATE is chosen Microsoft’s Negotiate SSP is used to instruct the client and server to negotiate on their own if NTLM or Kerberos should be used to authenticate users. By default this negotiation will always result in Kerberos if client and server support it.
This negotiation can be attacked from an intercepting network position to force the usage of NTLM over Kerberos, effectively downgrading the authentication scheme. The caveat is that this attack requires a suitable network position and missing signatures. I will not dive deeper into this at this point, mostly cause I’ve detailed the process and the attack in an older post here: Downgrade SPNEGO Authentication.
By the way the authentication service constants that mentioned here can be found here: https://docs.microsoft.com/en-us/windows/win32/rpc/authentication-service-constants.
That’s it.. you made it!
References
- Microsoft’s documentation of RPC: https://docs.microsoft.com/en-us/windows/win32/rpc/overviews
- Jonathan Johnson’s (more defensive focused) Review of RPC: https://ipc-research.readthedocs.io/en/latest/subpages/RPC.html
- Adam Chester’s Review of RPC: https://blog.xpnsec.com/analysing-rpc-with-ghidra-neo4j/
- A Code Project on how to start programming with RPC: https://www.codeproject.com/Articles/4837/Introduction-to-RPC-Part-1#Implicitandexplicithandles17