
A Windows Authorization Guide
Contents:
- Basic Access Check
- The Security Descriptor, DACL & SACL
- Integrity Level Check / Mandatory Integrity Control (MIC)
- Privileges
- UAC
- UAC for the RID-500er local Admin
- Disabling UAC For Non-RID-500er Admins
- UAC and Remote Access
- UAC And Pass-the-Hash
- Access Tokens
- Impersonation
- Privilege Escalation With Identification Tokens
- Privilege Escalation By Leaky Tokens
Compared to Linux, the Window’s authorization process is quite complex and quite a few actors and objects are involved in this process. As a result, there a lot of terms and acronyms that must be known in order to understand and follow up on the topic. To get an idea of what is covered in this guide take a look on this overview of terms and acronyms:
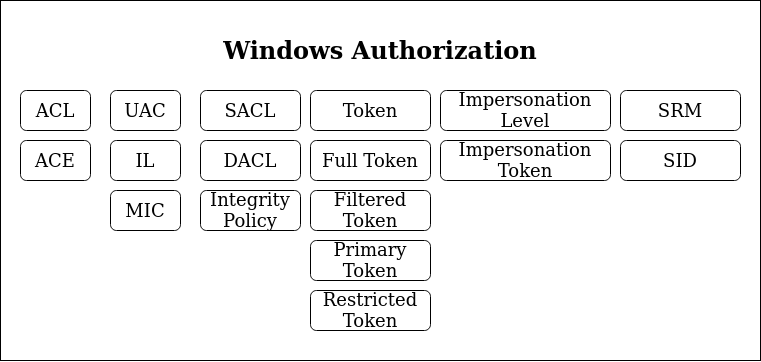
Facing this wall of acronyms, i’d say the best to get into this complex environment is to dive right in and cross reference all new terms.
For all of the following (and in general) be aware that there is a Windows Security Glossary that you could use to look up any acronym or term used in the following.
Basic Access Check
Starting with the simplest scenario: You log onto your Windows system and want to open a file. Who decides if you get access and how is this decision made?
As a reference recap how this decision is made on Unix systems. On Unix systems your user has a user- & group-ID and the access target (the file in this scenario) has an associated list of access permissions that could look like this:
-rwxr-xr-- 1 root root 2048 Jun 13 10:00 file.txt
The Unix OS checks these file permissions, figures that everyone got read access rights and grants the logged in Unix user read access. Most of the Unix authorisation decisions can be broken down to this very simple access check.
Now let’s dive into the Windows World:
Let’s start simple: When a user logs into his Windows machine (regardless if that is a local or a domain joined user), an Access Token is created for that user. Precisely that means this access token is created for that user’s logon thread.
When that logged on user tries to open a file, an access request is generated that specifies what the user wants to do with that file (access right). In our case the user simply wants to read a file, which maps to the GENERIC_READ access right. There are a set of different access rights, which at the end of the day are all just bitmasks representing numbers that serve as a global reference to have a clear definition of what the user requests to do. The most important access rights are the Generic Access Rights and the so called Standard Access Rights.
The user’s access request is taken on by a Windows component called the Security Reference Monitor (SRM), which takes on the requested access right along with the user’s Access Token and compares these bits of information against the defined access permissions for the requested file, which are composed in a structure called Security Descriptor.
Important to note here: Each Securable Object, which include files, directories, registry keys and many other things, has a Security Descriptor.
Okay let’s break that down in key »Take aways«::
- Each user logon thread has an access token
(Read this as: Each user got assigned an access token) - A required action, e.g. to open a file, is expressed in an Access Right, e.g. GENERIC_READ
- Each Securable Object has a Security Descriptor, which defines who can do what with that object.
- The Security Reference Monitor (SRM) is the software component in charge to evaluate if a certain process should be granted access to the requested object for the requested access right.
The key function for granting or denying access within the SRM is called SEAcessCheck.
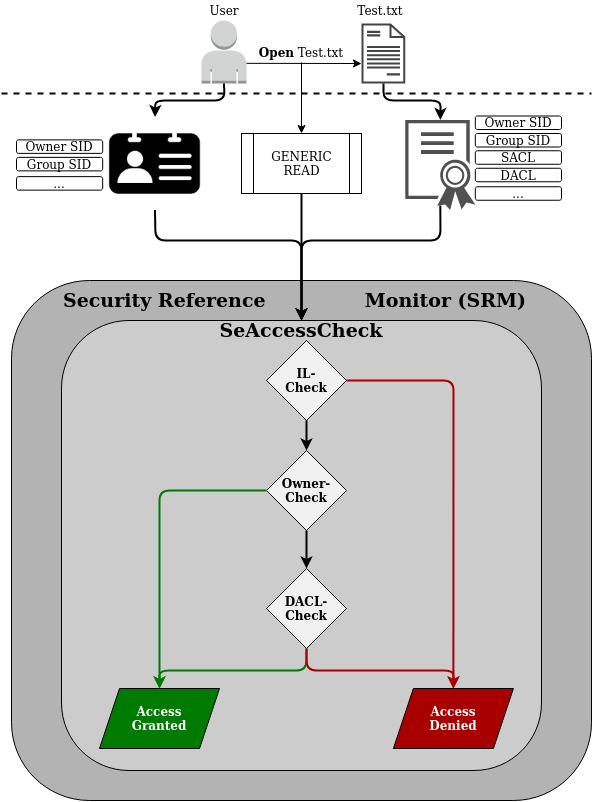
And since I really like visual representation of things, take the following picture to get an overview of what has just been introduced:
(I based that representation on a figure James Forshaw used in his 2015 BlackHat Talk)
Now that the basic concept of access checks in the Windows world has been introduced, let’s dig deeper into the individual components.
The Security Descriptor, DACL & SACL
This section will bring light on the Owner- and the DACL-Check shown in the figure above.
As mentioned previously each Securable Object has a Security Descriptor.
The Security Descriptor defines an object structure to keep record of to whom the referenced object belongs (Owner and Group) and to whom access is granted (or denied) for which actions.
To get an idea of what this looks like the following screenshot shows the Security Descriptor (as kernel object) of the running explorer.exe process:
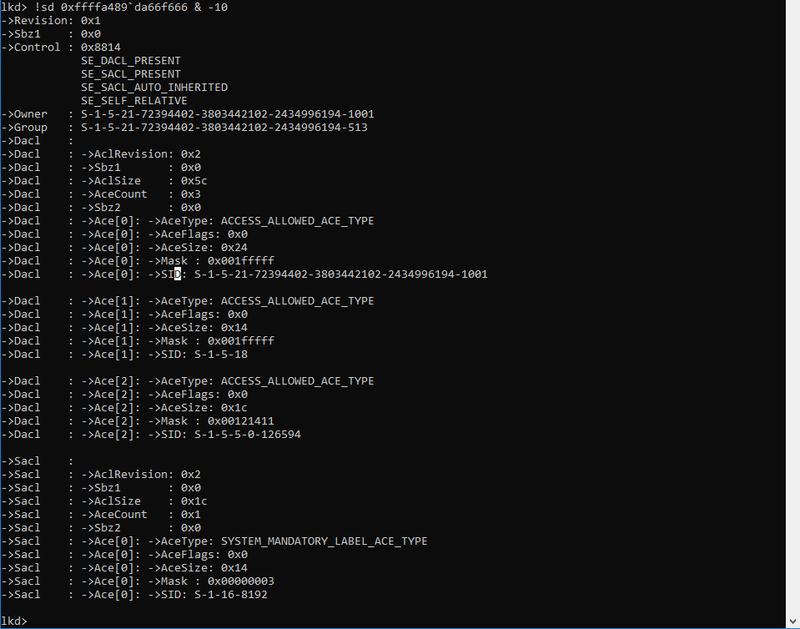
The most basic part here is the Owner and Group field, which are expressed by a Secure Identifier (SID). In the Windows world a SID is just a unique string to identify a security principal, e.g. a user, a group, etc. The SID consists of three blocks:
- The first part - always beginning with an ‘S’ - describes the group, e.g. Domain Everyone (S-1-1-0), Anonymous (S-1-5-7), Authenticated Users (S-1-5-11), which can be looked up in the register for Well-known SIDs.
- The second part is a unique domain ID (also present in each default WORKGROUP) (S-1-5-21), e.g. S-1-5-21-2884053423-3431565070-78458365-….
- The last part is called the relative ID (RID), which describes a user group inside a security group, e.g. the group of builtin Administrator group (S-1-5-32-544) or the builtin Guests group (S-1-5-32-546) or the famous default Admin account - by me often referred to as RID-500 Admin - (S-1-5-21-2884053423-3431565070-78458365-500). Note how the first two groups are in the same security group (S-1-5-32-…), while the RID-500 admin is in the domain security group.
Okay now back to our example from above: The Owner is set to the SID of S-1-5-21-…..-1001, which is the unique value for my current user and the group is set to the SID of S-1-5-21-…-513, which is the domain users group.
You can look up these SIDs in the register for Well-known SIDs
Apart from the owner and group of the explorer.exe process, the above shown Security Descriptor also contains two lists, the Discretionary Access Control List (DACL) and the System Access Control List (SACL):
The DACL is a list controlled by the owner of the Security Descriptor, that specifies the access particular users or groups can have on the object.
The SACL is a list controlled by system administrators, which holds two types of control entries:
- The SACL holds the MANDATORY_INTEGRITY_LABEL (more on this later); and
- The SACL holds control entries used for the generation of audit messages (which we ignore for now)
For the SACL just keep in mind that the MANDATORY_INTEGRITY_LABEL is stored in here (we ignore the rest for now…).
The DACL is the important control list used for the authorization process. Review the screenshot above and see that the presented DACL actually contains three Access Control Entries (ACEs). For each of the three ACEs the following important fields are set:
- SID: The SID defines the Security Principal (a user or group) to which the ACE applies.
S-1-5-21-…..-1001 references to one specific domain user.
S-1-5-18 references the local System account. - Mask: The access mask is a numeric value, which resembles a combination (addition) of multiple Access Rights, e.g. GENERIC_READ. The access mask is a data structure described in the Microsoft Docs here.
- AceType: The AceType defines whether access should be allowed or denied for the given security principal (SID) and based on the given access mask.
In the example above three ACEs with AceType ACCESS_ALLOWED_ACE_TYPE are given, which means that if the Security Reference Monitor (SCM) finds a matching access mask for the requesting user in any of these ACEs access will be granted.
For this part the important »Take away«: is:
The SCM will review the Security Descriptor of the requested object and iterate over each ACE in the Security Descriptor’s DACL and check whether the requesting user - identified by it’s SID and requested access right (e.g. GENERIC_READ) match with an Access Mask inside of an ACE. If a match is found the AceType of that ACE will determine if access is granted or denied.
A side note on empty DACLs:
If a DACL of a Security Descriptor is set to NULL, aka the Security Descriptor has no DACL, than full access is granted to everyone.
If the DACL of a Security Descriptor is empty, aka a DACL exists, but does not contain any ACEs than no access is granted to that object.
The last bit of information that is missing is the identity of the requesting user. The SRM gets the identity of the requesting user from the given user access token. Insights of how this token looks like will be given later, for now it’s just important to know that this token contains the SID of the requesting user, as well as the SID of the user’s groups.
Okay and now let’s put in the full picture for the SeAccessCheck:
After the Integrity Level-Check (IL-Check), which will be described in the following section, the Security Reference Monitor (SRM) queries the Security Descriptor of the requested object for the following information:
- Who is the owner of the requested object?
→ If the requesting user is the owner of the requested object: Grant Access - If the requesting user is not the owner, iterate over all ACEs in the DACL of the Security Descriptor and determine:
– Does the ACE apply for the requesting user by comparing the ACE SID to the user SID and his/her group SIDs ?
– Does the access mask contain the requested access right, e.g. does the access mask contain the GENERIC_READ access right ?
– Does the access type is set to allow access or is it set to deny access? - If any ACCESS_DENIED_ACE_TYPE matches the user and requested access right: Deny Access
- If no ACCESS_DENIED_ACE_TYPE but a ACCESS_ALLOWED_ACE_TYPE matches the user and requested access right: Grant Access
Next to the Owner and DACL checks there is only one element missing to understand the SeAccessCheck, which is the Integrity Level Check (IL-Check). So let’s dive into that.
Integrity Level Check / Mandatory Integrity Control (MIC)
This section will bring light on the Integrity Level Check shown in the figure above.
The Integrity Level check is meant to enforce another Windows control layer, called Mandatory Integrity Control (MIC).
Mandatory Integrity Control (MIC) provides a mechanism for controlling access to securable objects. This mechanism is in addition to discretionary access control and evaluates access before access checks against an object’s discretionary access control list (DACL) are evaluated.
Source: Mandatory Integrity Control
The first question that should arise in your head now is:
Why the f** do we need MIC? We got DACL checks, which are basically the same checks that are done in Unix systems – shouldn’t that be enough?*
The answer to this question is: Yes the DACL checks are the core of the authorization checks and the vast majority of all access request will be granted or denied based on the DACL checks. MIC is just another layer added by Microsoft in Windows Vista alongside with User Access Control (UAC) to get more fine grained control and to prevent compromised processes from accessing sensitive resources.
This is a very abstract answer to a simple question, but the following introduction to MIC and UAC will hopefully shed some more light on this.
Each Securable Object got a MANDATORY_INTEGRITY_LABEL set in it’s SACL. This label assigns one of four possible Integrity Levels (IL) to the object (as defined in Windows Integrity Mechanism Design):
- Low (SECURITY_MANDATORY_LOW_RID 0x00001000)
- Medium (SECURITY_MANDATORY_MEDIUM_RID 0x00002000)
- High (SECURITY_MANDATORY_HIGH_RID 0X00003000)
- System (SECURITY_MANDATORY_SYSTEM_RID 0x00004000)
These Integrity Levels label the degree of ‘security protection’ that has been assigned to a Securable Object.
»By default all objects are assigned with a Medium Integrity Label.
As an example refer back to the previous screenshot of the Security Descriptor, notice that the Security Descriptor of this object (the explorer.exe process) got the following MANDATORY_INTEGRITY_LABEL: SID: S-1-16-8192
A quick look up to the Well-known SIDs Register reveals that this SID describes the ‘Medium Mandatory Level’ (default for all objects).
»Take away«:
The whole story of integrity labels is to prevent lower level integrity processes from accessing higher level integrity objects.
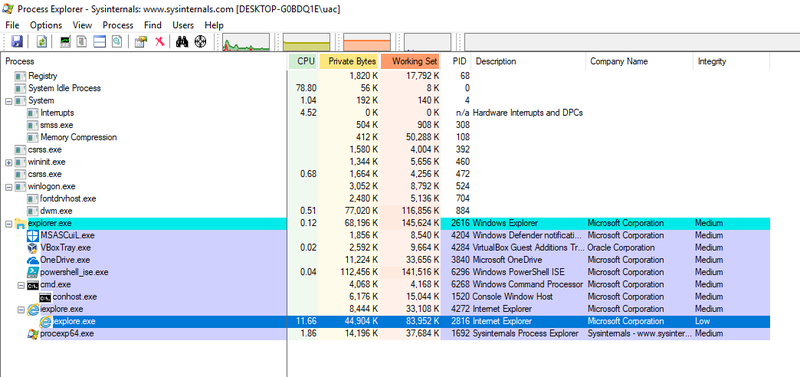
Another example: When starting the Internet Explorer, a low Integrity Level IE process will be spawned (see screenshot below). This low level IE process is the process that is used by the user for surfing the internet.
If this process is compromised, e.g. by exploiting an IE/Flash/etc. vulnerability, the process would not be able to access a user’s documents, because these were created with the default medium Integrity Level label (and the IE process is running with low integrity).
This is the point where the Integrity Levels checks should begin to make sense. Imagine the compromised IE scenario without MIC. The IE process has been launched by the logged in user and therefore is owned by the logged in user. The DACL-check would therefore grant the compromised IE process access to the user’s resources.
By enforcing an IL-Check, access to user resources is denied to the compromised IE process.
So am I saying that access is generally denied when a process with a lower Integrity Level tries to access a resource with a higher Integrity Level? Of course not – why should it be that simple…
During the Integrity Level check, the SRM compares the Integrity Level of the requesting process with the Integrity Level of the requested object and decides to go to the DACL check or denies access based on the Integrity Level Policy defined for that object.
The Integrity Level Policy of an object is based on the following three defined states (as defined in the SYSTEM_MANDATORY_LABEL_ACE Structure):
- SYSTEM_MANDATORY_LABEL_NO_WRITE_UP ( 0x1 )
- SYSTEM_MANDATORY_LABEL_NO_READ_UP ( 0x2 )
- SYSTEM_MANDATORY_LABEL_NO_EXECUTE_UP ( 0x4 )
Once again refer back to the Security Descriptor of the running explorer.exe given in the previous section. Notice that the Access Mask of the SACL ACE SYSTEM_MANDATORY_LABEL_ACE_TYPE is set to 0x00000003, meaning that this integrity policy denies READ and WRITE access attempts from processes with a lower Integrity Level than Medium, which is the integrity level of that object.
That’s the story of integrity level checks.
Refer back to the initial figure and double check that all makes sense now.
Privileges
The best way to introduce Privileges is with the official MSDN explanation:
A privilege is the right of an account, such as a user or group account, to perform various system-related operations on the local computer, such as shutting down the system, loading device drivers, or changing the system time. Privileges differ from access rights in two ways:
- Privileges control access to system resources and system-related tasks, whereas access rights control access to securable objects.
- A system administrator assigns privileges to user and group accounts, whereas the system grants or denies access to a securable object based on the access rights granted in the ACEs in the object’s DACL.
Each system has an account database that stores the privileges held by user and group accounts. When a user logs on, the system produces an access token that contains a list of the user’s privileges, including those granted to the user or to groups to which the user belongs. Note that the privileges apply only to the local computer; A domain account can have different privileges on different computers.
Source: https://msdn.microsoft.com/en-us/library/windows/desktop/aa379306(v=vs.85).aspx
To enumerate what privileges your user has, simply run the following command and find the list of privileges at the end of the outputted result
C:> whoami /all
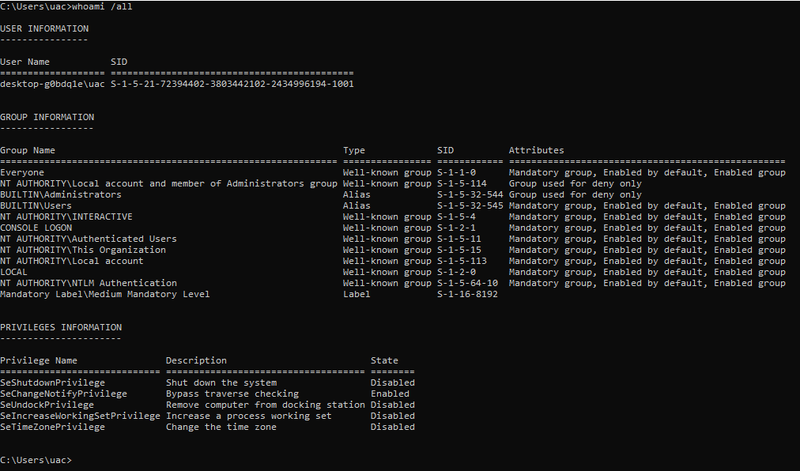
Notice how the privileges expand once you run that command in a cmd started with “Run as administrator”:

To cross check or look up the privileges you got you can use the following MSDN resource:
https://msdn.microsoft.com/en-us/library/windows/desktop/bb530716(v=vs.85).aspx
UAC
The sole purpose of User Access Control (UAC) is to have more fine-grained control over administrative execution and to prevent administrative users to use their admin execution rights when it’s not needed.
Recall from the introduction that by logging into your Windows computer your logon thread is assigned a user access token and all child processes launched by that user will inherit this token. For non-admin users this is a Medium Integrity token with your default privileges.
Prior to Windows Vista admin users got a high integrity token with all administrative privileges and each child processes launched would inherit this token. This meant that all processes spawned by an admin user would run with high privileges even if the process would not need those high privileges (e.g. the explorer.exe started by an admin would run with a high integrity token and full admin privileges without needing those privileges). UAC was introduced to fix this.
»Note: All of the following explanations assume that UAC is enabled and the administrative user we’re talking about is not the local RID-500er administrator (we get to that special case afterwards)
Since UAC was introduced in Windows Vista, when an admin logs in two access tokens are created:
- A Full Admin Token, also often referred to as ‘Non-filtered Token’ or ‘Full Token’, with high Integrity Level (IL) and all administrative privileges
- A filtered admin token, also often referred to as ‘Standard Token’ or ‘Restriced Token’, with medium integrity level (IL) and reduced privileges
These two tokens are linked together in the kernel, so that an executing thread could access both tokens if needed.
Now if an admin user logs into his account and launches cmd.exe this process will be spawned using the filtered, medium integrity token (remember: UAC is enabled and the user is not the RID-500 administrator). Thereby high access privileges are not given to processes that do not need those.
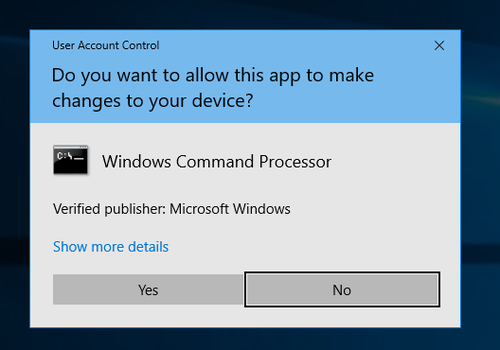
But in case the administrator user needs to run a process with full admin privileges he can ask the operating system to elevate this processes privileges with his full admin token, this is the ‘Run as administrator’-button. This will cause the prominent ‘consent’ prompt to pop up (C:\Windows\System32\consent.exe) as shown in the screenshot below:
By accepting this consent prompt, the system will create the elevated process (in this case cmd.exe) with full admin privileges, as it can be seen in the screenshot below:
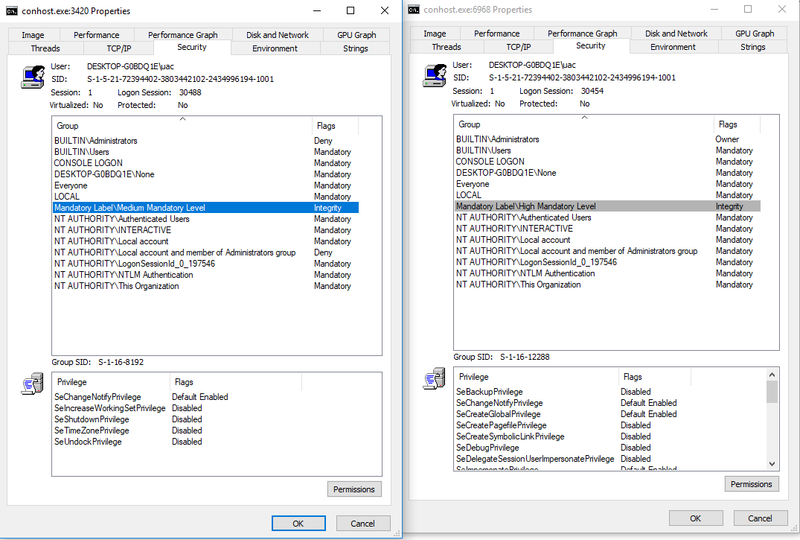
The cmd.exe process (note that conhost.exe is the child processes created by cmd.exe) launched by the administrator without elevating is shown on the left and the elevated cmd.exe by hitting ‘Run as administrator’ is shown on the right.
Also compare the Integrity Levels and Privileges of these processes to determine which is which.
UAC for the RID-500er local Admin
All of the explanations above are only true for local or domain administrators that are not the RID-500er local admin. Each installation of Windows comes with a local Administrator account (which is disabled by default), that can be identified by the Relative Identifier (RID) of 500 (SID: S-1-5-21-DomainID-500).
The Story for the RID-500 local admin is that this account is not enrolled in UAC by default.
That means that if you log in to your Windows computer with the RID-500er local admin account you will be assigned a high privileged full access token right away (and don’t get a ‘filtered’ medium integrity token). If you run cmd.exe (or anything else) with the RID-500 local admin, even without specifying ‘Run as administrator’, then the cmd.exe will spawn with full administrative privileges and a high Integrity Level (because your only got a full token that the cmd.exe process can inherit). If you hit ‘Run as administrator’ with your RID-500er local admin there will be no consent prompt.
The RID-500er admin is by default not enrolled in UAC, but can be enrolled by setting the following registry key to ‘1’:
HKLM\SOFTWARE\Microsoft\Windows\CurrentVersion\Policies\System\FilterAdministratorToken
As shown in the following screenshot the FilterAdminstratorToken has been set to ‘1’ in this instance, which enrolls the RID-500er Admin in UAC (and thereby all of the rules mentioned previously would also apply for this user).

Disabling UAC For Non-RID-500er Admins
So by default the RID-500er Admin is not enrolled in UAC, but all other admins (meaning local or domain users that are in the administrative group) are enrolled in UAC.
Now as the RID-500er admin user can be enrolled in UAC, also the Non-RID-500er admins can be dis-enrolled from UAC, by setting the LocalAccountTokenFilterPolicy to ‘1’.
HKLM\SOFTWARE\Microsoft\Windows\CurrentVersion\Policies\System\LocalAccountTokenFilterPolicy
This registry key is not set by default, so if this key is missing all non RID-500er accounts are enrolled in UAC:

UAC and Remote Access
All of the above is true for local access, meaning your user locally logs into the computer and executes processes. Now for remote access there is another addition to the story.
The short version: For remote access (e.g. via wmic) domain administrators are given a full high integrity access token, but local Non-RID-500er admins will only be given a medium integrity restricted token.
Terming it the Microsoft way:
1) Remote Access for Local Admins (Non-RID-500er):
Source: https://support.microsoft.com/en-us/help/951016/description-of-user-account-control-and-remote-restrictions-in-windows
When a user who is a member of the local administrators group on the target remote computer establishes a remote administrative connection … they will not connect as a full administrator. The user has no elevation potential on the remote computer, and the user cannot perform administrative tasks. If the user wants to administer the workstation with a Security Account Manager (SAM) account, the user must interactively log on to the computer that is to be administered with Remote Assistance or Remote Desktop.
2) Remote Access for Domain Admins:
Source: https://support.microsoft.com/en-us/help/951016/description-of-user-account-control-and-remote-restrictions-in-windows
When a user with a domain user account logs on to a Windows Vista computer remotely, and the user is a member of the Administrators group, the domain user will run with a full administrator access token on the remote computer and UAC is disabled for the user on the remote computer for that session.
» This addition to UAC applies for remote administrative access, this does not affect Remote Desktop connections (which are considered as local logon).
UAC And Pass-the-Hash
Now comes the kicker.. Let’s face the following question:
Q: The following accounts try to establish a remote connection to a computer with default settings via a pth-attack (pass-the-hash) (using psexec or wmic).
Who will be able to establish a successful remote connection and why?
- a) The Local ‘Administrator’ - SID: S-1-5-21DomainID-500
- b) The Local user ‘LocalAdm’ who is member of the local Administrators Group (SID: S-1-5-32-544)
- c) The domain user ‘Lab\Frank’ who is a standard domain user without administrative privileges
- d) The domain user ‘Lab\Bob’ who is a member of the domain Administrators group
Be aware that remote access requires to launch high privileges processes and consider that there is no way to remotely elevate privileges.
——– SPOILER / ANSWER ——–
Answer: a) & d) are correct
And here’s why:
a) –> The local 500er Admin is not enrolled in UAC per default. The 500er admin receives a full access token per default and can establish a remote connection.
b) –> The non-500er local Admin is enrolled in UAC, but does not receive a full access token.
The full story here is: The non-500er admins tries to log in and gets a standard/medium access token. The remote connection access requires to start full token administrative access processes, which the user does not have (he/she got the medium token). Thereby his connection is refused.
c) –> Same story as for the non-500er local Admin. He/she gets a standard (medium) token and is rejected.
d) –> The domain admin is enrolled in UAC but gets automatically elevated. This is the exception that applies to remote access compared to local access.
The full story is: The domain admin, tries to log in, automatically receives a full/admin access token (instead of a standard/medium access token) and is able to get a remote shell.
If you’re still interested i also recommend a read over harmj0y’s blog post on Pass-the-Hash Is Dead: Long Live LocalAccountTokenFilterPolicy https://www.harmj0y.net/blog/redteaming/pass-the-hash-is-dead-long-live-localaccounttokenfilterpolicy/
Bonus Kicker: As mentioned before, the UAC remote rules do not apply for remote desktop connections. Therefore, if your user is part of the remote desktop user group you could also go for pass-the-hash via remote desktop, as described here: https://www.kali.org/penetration-testing/passing-hash-remote-desktop/
Access Tokens
So far when talking about basic access checks or UAC, user ‘access tokens’ were introduced. This access tokens hold information about the current user and the user’s groups and are for example used by the Security Reference Monitor (SRM) to determine who is requesting access.
These tokens are of major relevance for the access check and also play a role for certain privilege escalation attacks. Therefore it’s worth getting a closer look at access tokens.
So to start with there are only two kinds of token:
- Primary Tokens, which are assigned to processes; and
- Impersonation Tokens that are assigned to threads
Two kinds of tokens, that’s it. ‘Filtered tokens’, ‘Restricted Tokens’, ‘Full Tokens’, ‘Admin Tokens’, or in general ‘Access Tokens’, are just names given to describe the token, but all of these are Impersonation Tokens.
Both, primary and impersonation tokens, consist of the following major fields:
- User SID: the SID of the user (impersonation token) or the SID of the user that created the process (Primary token)
- Group SIDs: Group SIDs of the corresponding user (User SID)
- Logon SID: Identifies the current logon session
- Privileges: List of Privileges the User (impersonation token or process has)
- Primary Group SID: identifies the primary group of the impersonated user (impersonation token), e.g. ‘Domain Users’
- Default DACL: The default DACL that the system uses when a user creates a securable object without specifying a security descriptor (comparable to Linux umask)
- Type: Information if token is primary or impersonation
- Impersonation Level: The degree (level) of allowed impersonation.
- Integrity Level: SID of integrity level
- …
It is the token that is passed to the SRM to determine if a process has access to an object, therefore if you are able to obtain a high privileged token, you can escalate your privileges.
To get a hands on experience with tokens, James Forshaw develop the great tool Token Viewer (contained in the Sandbox-AttackSurface-Analysis-Tools), which is shown below:
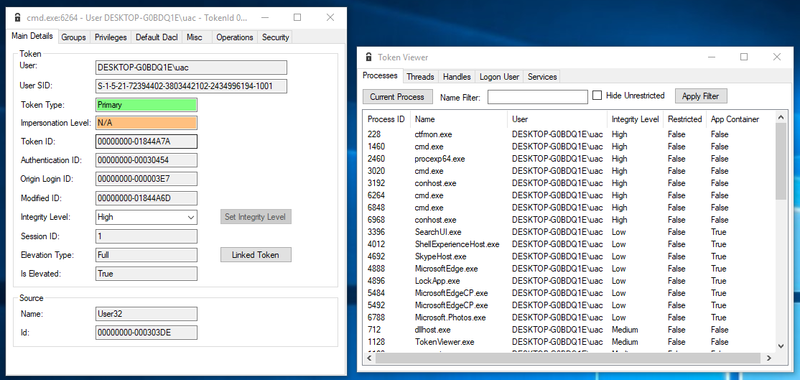
In the right window a list of processes is shown. The token of one of the high integrity cmd.exe processes was opened and is shown in the left window. Notice that the token type is primary (because it’s a process) and the Integrity Level (IL) is set to High (because the cmd.exe process was started as elevated process by an admin).
Keep in mind that each process has a token assigned to it and this token is always a primary token.
Now let’s move to threads. Remember from the introduction that a user is assigned with a token once the user logs in and more precisely that means that the user’s logon thread is assigned with an impersonation token. A process can only have a primary token, but a thread can have an impersonation token as well as a primary token, in which case the impersonation token will always take primary over the primary token.
(… yep I know. Microsoft just sucks when it comes to naming things)
An example of an impersonation token is given below:
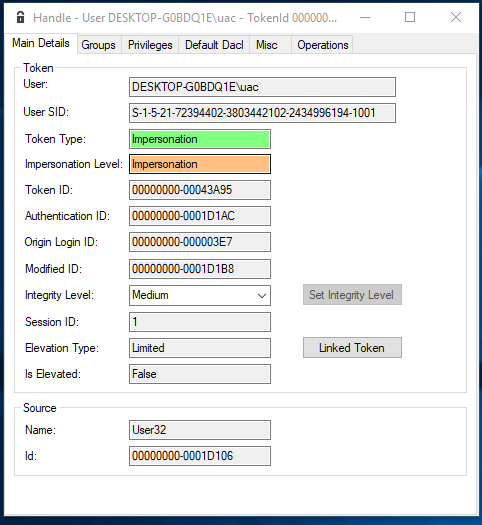
Notice that the token type now says ‘Impersonation’ and that now also the field ‘Impersonation Level’ is set to ‘Impersonation’. The impersonation level is an important field that influences if a token can be impersonated (more on this in the next section).
So far so good. The key take away here is that there are only two types of tokens for processes and threads.
Impersonation
The process of impersonation is quite important and frequently used in the Windows authorization process. To understand why impersonation is used we first must take a step back:
Imagine a user wants to delete a file on a remote file share. Now the server hosting the file needs to determine if the user is allowed to do that. The server can’t access the user’s access token because that token is not accessible in the remote server’s memory (the token is stored on the computer of the user requesting to delete the file). What the server could do is query the user’s account and group information from the Active Directory (AD) and check manually if the user is allowed to delete files, but this task is tedious and prone to errors. Therefore another approach was implemented and termed ‘Impersonation’.
The basic idea is that the server simply pretends to be the requesting user and carries out the requested action as if the server was the user. So what the server does is it duplicates the user’s Impersonation token and requests the action (e.g. delete a file) with that duplicated token (as if the server was the user).
Impersonation is a powerful feature, it enables a process to pretend to be someone else.
OK Million dollar idea: I just impersonate the token of a high privileged user and gain instant privilege escalation! … Nice thought, but obviously it cannot be that easy. There are two obstacles in the way:
- a) Not every impersonation token can be used to carry out actions
- b) You need special privileges to be able to ‘impersonate’ a token (which technically means duplicate a token)
The first obstacle is that not every token is actually ‘valuable’. What that means is that each impersonation token got an attribute called Impersonation Level, that can have one of the following values:
- Anonymous Level - the server can impersonate the client, but the token does not contain any information about the client. Anonymous level is only supported for inter process communication (e.g. for named pipes). All other transports silently promote this to ‘Identification Level’
- Identification Level - This is the default. The server can obtain the identity of the client in order to do ACL checks. You can use that token to read information about the impersonated user or check the resources ACL, but you can’t actually access that resource (read/write/execute)
- Impersonate Level - The server can impersonate the security context of the client in order to access local resources. If the server is local, it can access local and network resources. If the server is remote it can only access resources on the same machine as the server.
- Delegate Level - The most powerful impersonation level. The server can impersonate the security context of the client to access local or remote resources.
So what you want is an Impersonation or Delegation Level impersonation token to be able to actually do anything (a little more on this in the next section).
The second obstacle in your way is that you need special privileges in order to be able to duplicate (impersonate) another token. That special privilege is TOKEN_DUPLICATE (as specified in Access Rights for Access-Token Objects).
The plot twist here is that if you do not hold this privilege, your request to duplicate a token is not denied, you still get a duplicated token, but one with a lower Impersonation Level.
The flow of duplicating/impersonating another token is shown below:
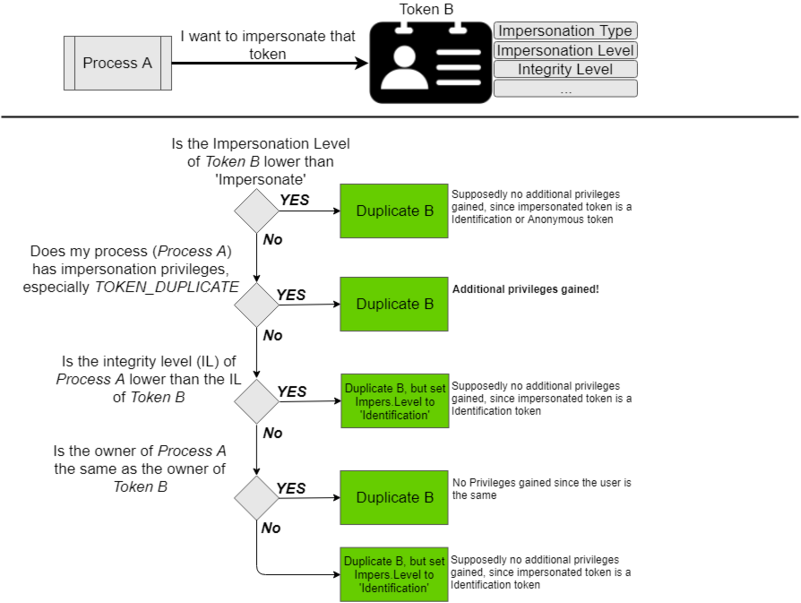
So at the end of the day you either hold the TOKEN_DUPLICATE privilege (or compromised a process that holds this) or you end up with an Identification Level token, which is supposedly of no use to an attacker because you can’t carry out any action with that.
At this point we’re almost done with tokens. The following sections are meant to get you into the mind-set of privilege escalation attacks based on tokens…
Privilege Escalation With Identification Tokens
The previous section describes that it is pretty easy to obtain an identification token.
To once more underline the fact that this is true, I activated the local administrator account on my windows machine and used Forshaw’s Token Viewer tool, to impersonate the Administrators Impersonation token (for more details check out His 2015 BlackHat Talk):

I ran this tool with a standard non admin user, and still got access to the Administrators token. It feels odd, but based on the access check for duplicate tokens that was presented in the previous section, this is all as it should be.
Notice that I only gained an Identification Impersonation Token.
There should be not much that I can do with that token, especially not carry out administrative tasks or access protected resources…
… unless of course some programmers forget to check the Impersonation Level of the token that is presented for authorization checks. James Forshaw found that this happened for some windows components, which resulted in CVE-2015-0002 as shown for example in this PoC.
I highly recommend to review James 2015 BlackHat Talk to understand the full impact and application of this vulnerability, but the basic story for this was that a certain Windows component made an access check to verify if the presented impersonation token belongs to an Administrator, but the component only checked the Impersonation type and the associated groups and totally ignored the impersonation level, which resulted in access for any user that could present a high integrity identification token with administrative groups… Amazing finding!
Privilege Escalation By Leaky Tokens
Another privilege escalation vulnerability that Forshaw found is what he termed ‘Leaky Tokens’. The basic idea of this kind of vulnerability is as follows:
Kernel code can access any kind of token to read and manipulate it. So what if you found a Windows kernel component that just gives out tokens, that it had accessed, back to the user ?!
It sounds a bit too obvious that this is flawed, but Forshaw found that an undocumented win32k system call existed that passed a previously used token right back to the user.
This flaw exited in the kernel code for the Windows clipboard (used for copy+paste). So once an administrator copied something (e.g. say text from an editor), any user could call the undocumented function NtUserGetClipboardToken and get back the previously used admin access token.
This was raised by Forshaw in CVE-2015-0087.