Untangling Azure Active Directory Principals & Access Permissions
Contents:
- TL;DR
- Intro
- Access Permission Breakdown
- Effective Access Permissions
- Applied Scenario: Who has access to what?
- Automation - Introducing: Azure-AccessPermissions.ps1
- References
TL;DR
I’ve released a PowerShell script to enumerate access permissions in an Azure AD tenant, if you just came for the tool, here’s your fast track: You can find the tool here, see how it’s used and what the output looks like in the last section.
Intro
All my live is learning in progress:
If you spot something that is technically incorrect, misleading or unclear: Let me know about it and I’ll fix it.
While preparing an Azure Active Directory engagement it took me a couple of days to untangle and structure the various actors in the game of “who has access to what” in Azure Active Directory, so I figured I’ll preserve my learnings for my older self and those that also need to get an (hopefully) easier start into this topic.
Before diving into the matter, let me quickly note a few things that I found difficult to understand, to share what might get people lost:
- The number one pain point for me was the lack of clear, uniformly naming and presentation schemes of different components, for example when comparing objects accessed through the Azure Portal with objects accessed via the official Microsoft Graph PowerShell module.
- Additional when focusing only on a single source of access (Portal or PowerShell module) it’s hard to make sense of different attributes that all sound similar when looking for “who has access to this”.
- Finally: When diving into these topics and reading documentation, it’s really hard to keep track of way to many acronyms, terms and concept/logic junctions that are introduced way to early.
Enough whining, here’s my attempt to make thinks more understandable…
Access Permission Breakdown
Before anything else let’s define who are the actors in this game of “who has access to what”. Readers coming from an Active Directory (the on-premise thing) home base will know that not only your registered Users can have access to certain resources, but that also other identities exist that could have access to things. Therefore, an identity that can access something is usually not referred to as “User” (cause that would miss a few other actors), but as “Principal”. Using that notion there are 3x principals that can have access to things in Azure Active Directory:
- Users
- Groups
- Service Principals
To keep everyone on track early on: We’ll have a closer look on what “Service Principals” are, but to make this term ‘usable’ right from the start here’s the quick preview:
Service principals are entities that act on behalf of an application (e.g. Outlook). In a sense they represent an instantiated ‘user’ object bound to an application.
To get a hold of what applications and service principals are, let’s assume we’re in an entirely empty Azure universe for a moment. We start to populate the environment by adding users and organize our users in groups. To get us productive and use our universe we’ll now add an application that will allow us to access and modify our environment.
We could start with an application that everyone knows, like “Outlook”, but we don’t want to send/receive mails, instead we want to have a unified API to access all the components in Azure, so we’ll start with the application “Microsoft Graph” (choosing Microsoft Graph will have reference benefits later on). When speaking about “the application” (Microsoft Graph in this case), this application will in some documentations also be referenced to as “Resource application”. I like this notion for our case as it indicates that our application holds resources that we (and others) later want to access, for example our “Microsoft Graph” application holds information about user and group resources (you will see how this notion comes in handy later on).
We have coded the application and are now integrating it into our Azure environment, aka. in our Azure tenant. To do that we’re logging into the Azure Portal, head over to “Azure Active Directory” and click “App registrations”.
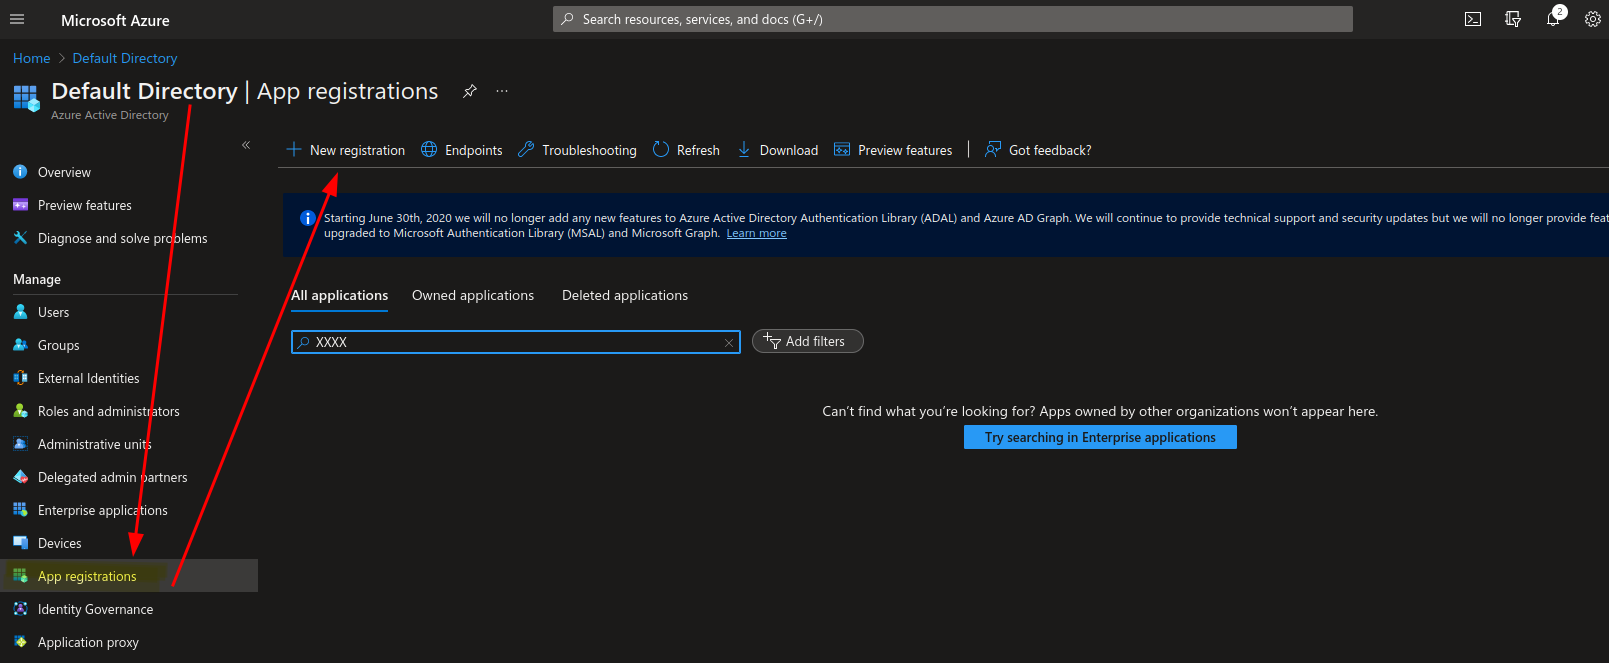
When registering our “Microsoft Graph” application using this UI flow, we can set a name and a few other settings that are not too interesting for us in this moment. What is important though is that once you hit the “Register” button 2x new objects are created in your Azure tenant:
- An application object that represents your application (“Microsoft Graph”). This object holds all the app settings you made.
- A service principal that acts as an ‘‘identity entity’ for your application. If your application needs to access other resources it is not the application object that is interacting with the other resource, it is your application’s service principal.
While the application object serves as a technical container to represent your application (and all its settings), the application’s service principal primarily acts as identity principal in the sense that it can make access requests and has access rights.
Technically we could also impose these technical capabilities to the application object, so why do we need a second object?
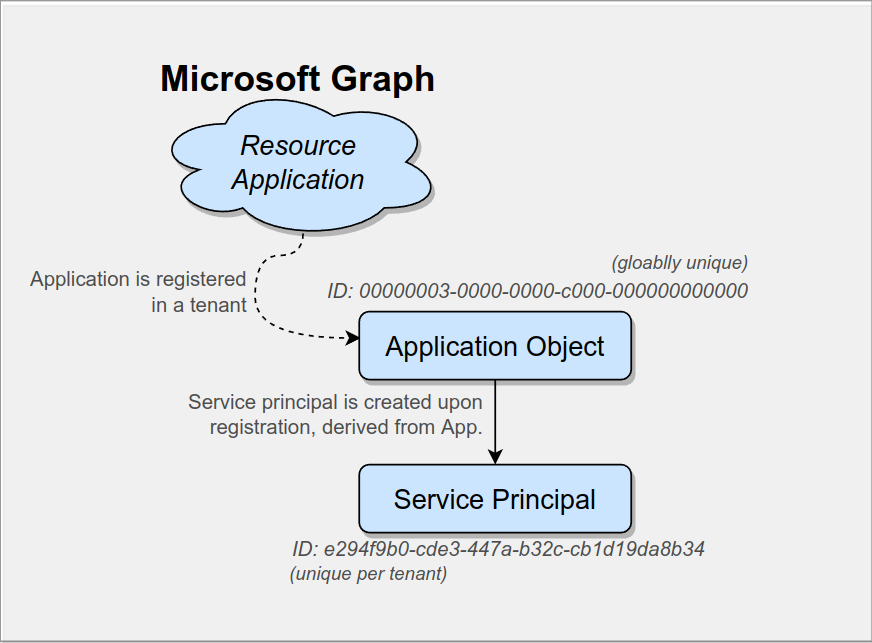
In our current scenario there is only our Azure tenant in the universe, but sooner or later other customers will join the cloud party and will have their own tenants and we want them to be able to use our application. In order to operate in another tenant, our application needs an identity within that other tenant that can access objects and do stuff. This is where our application’s service principal as a standalone identity comes in handy. While the application objects only lives in the tenant that registered the application (its ‘home tenant’) a (application) service principal is created in any tenant that installs the application. By using the concept of a “service principal” we have an individual object in all tenants that use our application, which shares some common attributes derived from our application object. These service principals allow us to set up and operate our application in any given tenant.
To summarize this is where we are at the moment:
Applications and Enterprise Applications
To recap and summarize from the previous section:
- Registering your application in your tenant results in an application object and a service principal object being created in your (home) tenant.
- Installing an application of someone else in your tenant results in (only) a service principal being created in your tenant.
This helps to understand the difference between “Applications” or “App registrations” and “Enterprise Applications” when browsing through the Azure portal. The Azure Portal menu item “App registration” will show the application objects of your tenant.
The menu item “Enterprise applications” will show the service principals installed in your tenant.
This is why the blue help button under “App registrations” (see first screenshot of the previous section) suggest to search under “Enterprise applications” if you can’t find the application that you’re looking as: “Apps owned by other organizations won’t appear here [under ‘App registrations’]”.
But don’t fall into the “My objects are under ‘App registration’ and the objects of other organizations are under ‘Enterprise applications’” trap.
Remember: Once you register your application within your tenant you will find the application object of your app listed under “App registrations” and the service principal of your app listed under “Enterprise applications”.

App Roles
Okay so far so good, we understood application objects and (application) service principals. For the next part of the puzzle let’s refer back to our resource application. Remember how we introduced this notion to indicate that our application holds resources (users, groups) that we’d like to access. So far, we have not specified any boundaries for that access in the sense of permissions, e.g. are all our service principals allowed to read and write to all the resources in our application? Certainly not. We want fine grained access control and that is what “AppRoles” are for.
An “AppRole” is an access permission grant defined as string, for example in the form of this: User.ReadBasic.All
This AppRole is meant to express that whoever holds this “AppRole” should be allowed to read basic information (e.g. names) of all user objects from our resource application. As Andy Robbins puts it in his great blog post, these “AppRole” permissions are usually expressed in the following format: Resource.Operation.Constraint
Alright, let’s add that to the picture:
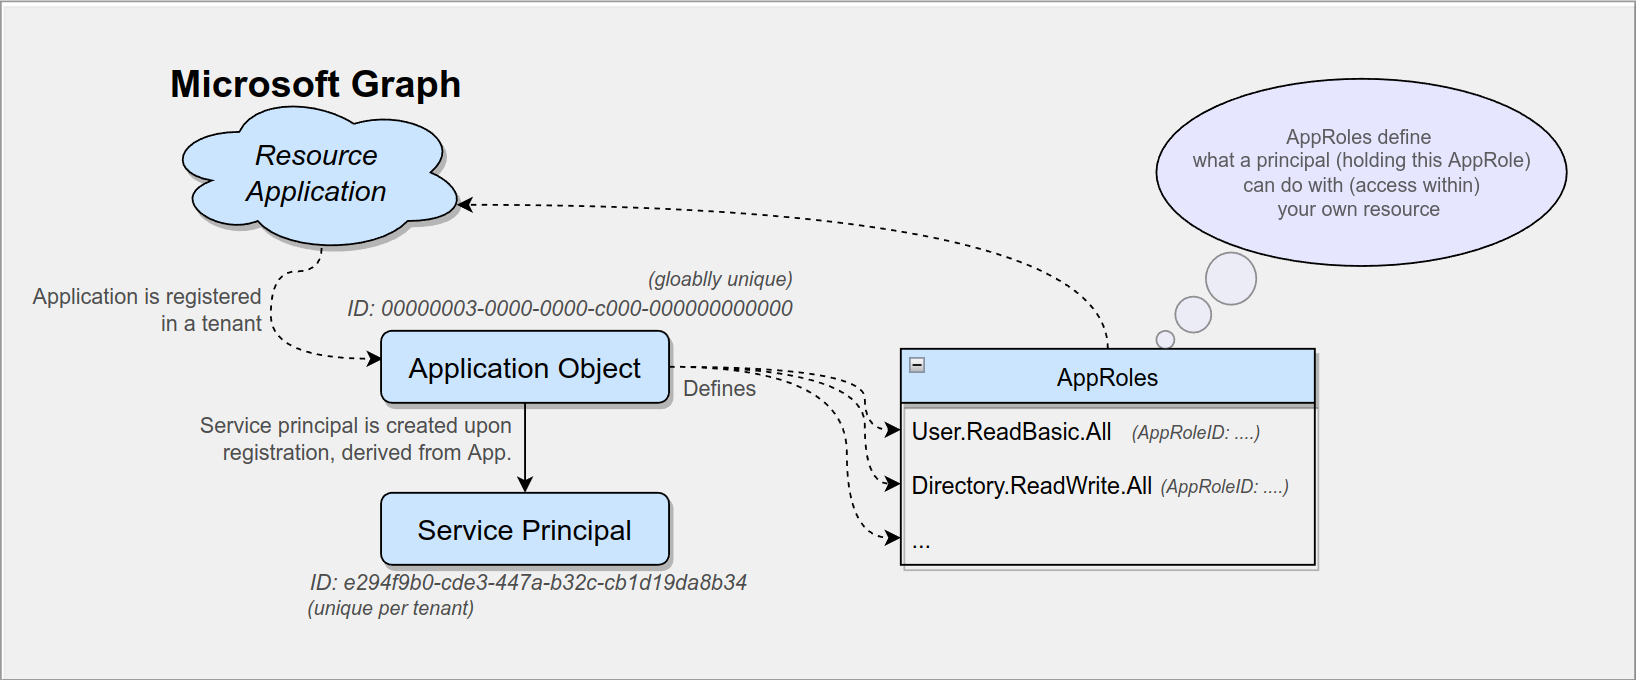
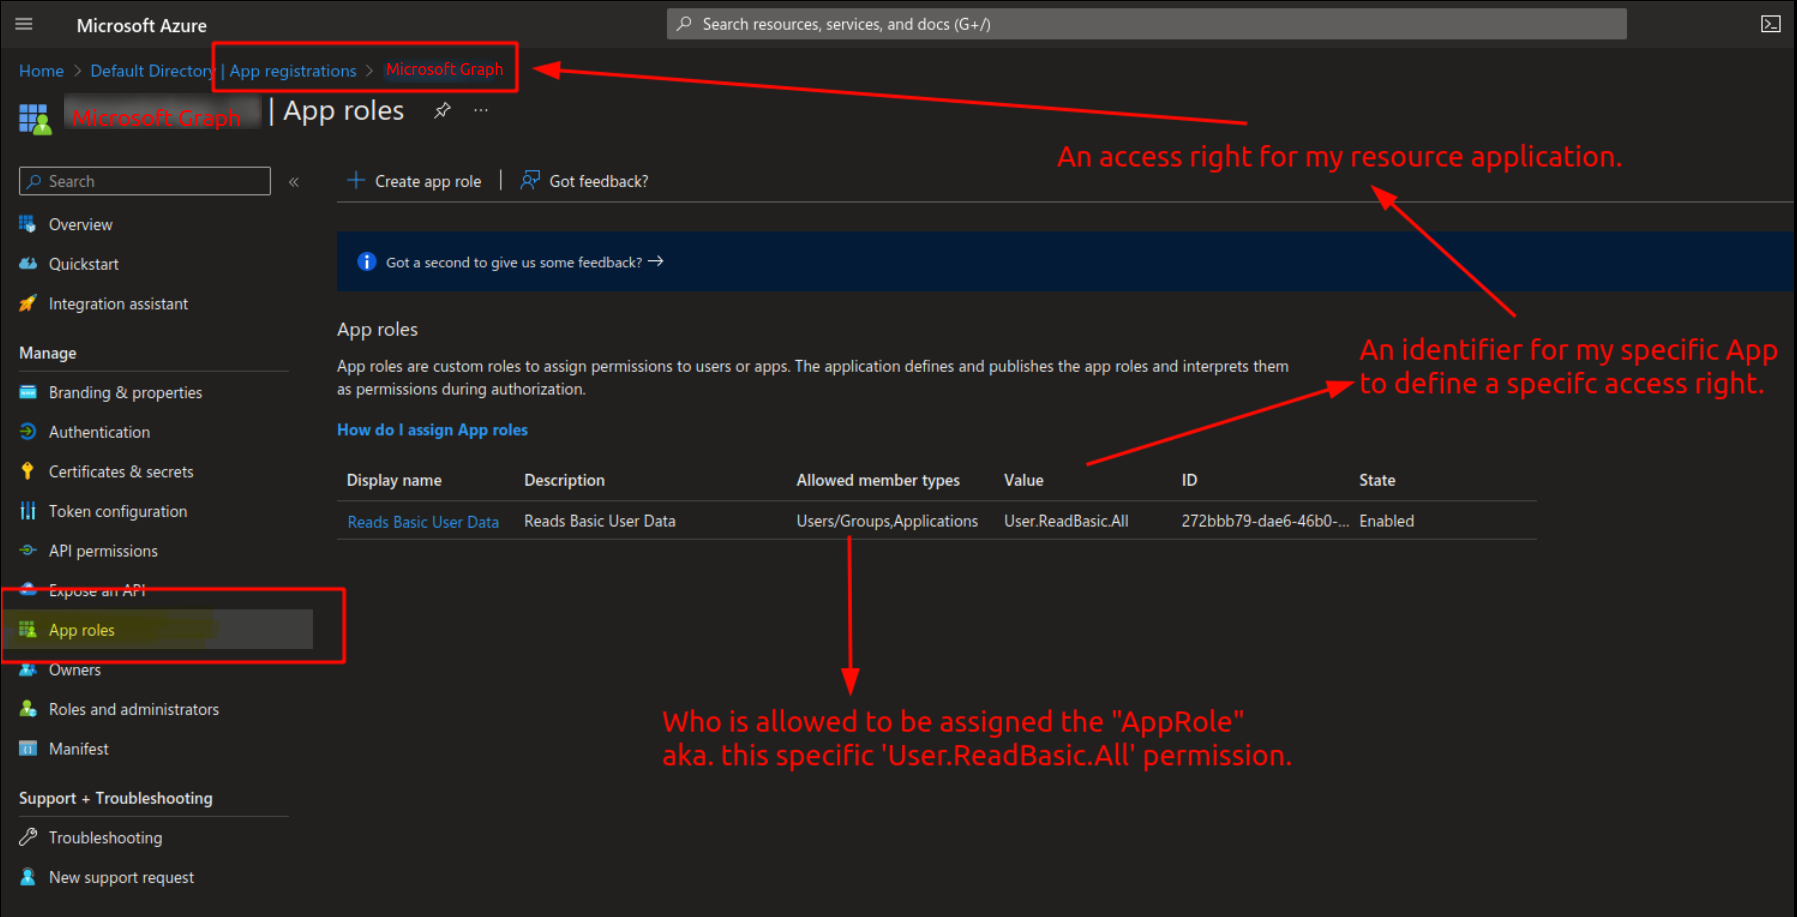
To make an “AppRole” more understandable, AppRoles are not defined as simple string attributes, but are contained in a separate object where you can also add in a more user-friendly display name, a description and of course a unique ID (AppRoleId), in order to reference a specific AppRole.
We can find all of this in the Azure Portal under “App registrations” » <YourApplication> » “App Roles”:
API Permissions
Everyone that had browsed to the “App registration” view in a quest to define access rights to their application must have wondered at some point what the “API permissions” menu item is for, which is also contained in the same menu blade that contains the “App roles”. At least this menu item does sound similar in regards to granting access to…something…
The idea here is that while under “App roles” you can define access definitions to your own application.
The menu item “API permissions” on the other hand allows you to set in permissions for your application to access other public APIs.
This is the scene where you say “My application needs to access data from another resource application (managed within Azure) and I want to allow my application to do that”. If you’re now thinking: “My application is accessing something else, aka. making an authenticated access requests – that sounds like something the service principal of my application is responsible for”, then you are right on track. That is exactly what the service principal of your application is for.
In order to make this scenario a bit more visual we will leave our previous scenario of managing the “Microsoft Graph” application and will now take a second seat where we are an ordinary company that has developed and registered their favorite “SampleApp” application into their Azure (home) tenant. In order for our “SampleApp” to function properly we need to query basic user information in the tenants of our clients. We decide the best way to do this is by querying a public Microsoft API and as the “Azure AD Graph API”, which had been the previous data authority, will be deprecated by the end of 2022, we want to use the new Azure data authority, the “Microsoft Graph API”.
In order to do that we click on “API Permissions” within the “App registration” view and then click on “Add a permission”, you can see that flow and the result below:
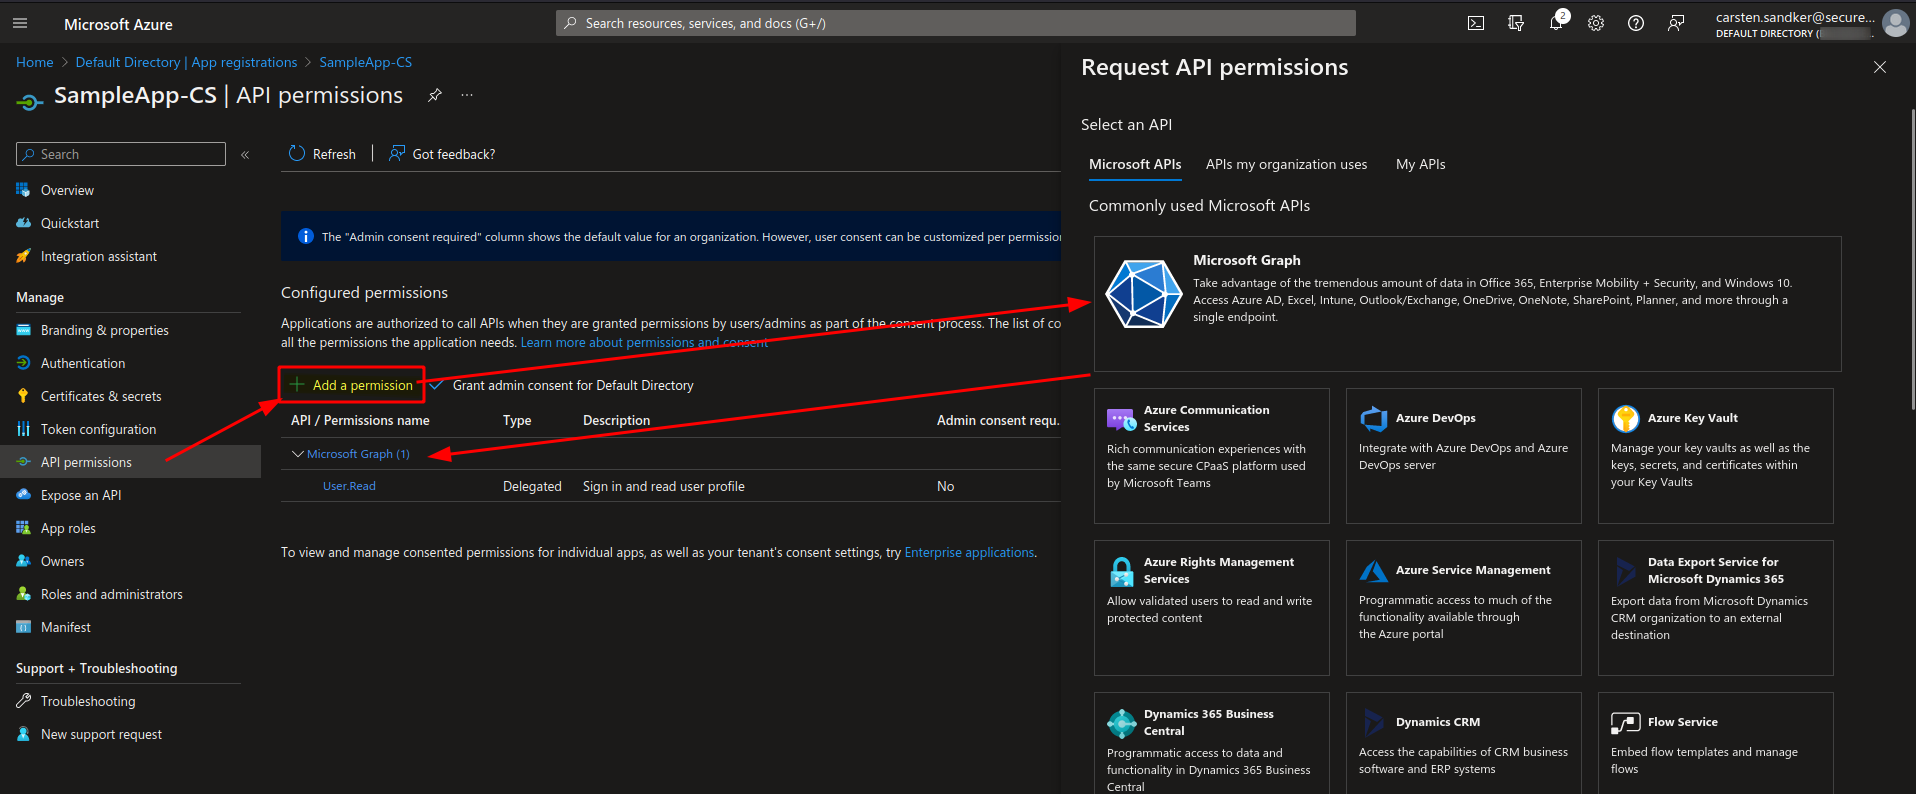
Having a close look to the shown API Permissions we can spot that we don’t just specify broad access to the Microsoft Graph Resource application, but instead we use the exact “AppRole” definitions that have been specified in the previous section. These “AppRoles” of the Microsoft Graph resource are now used by our “SampleApp” to specify what access we need.
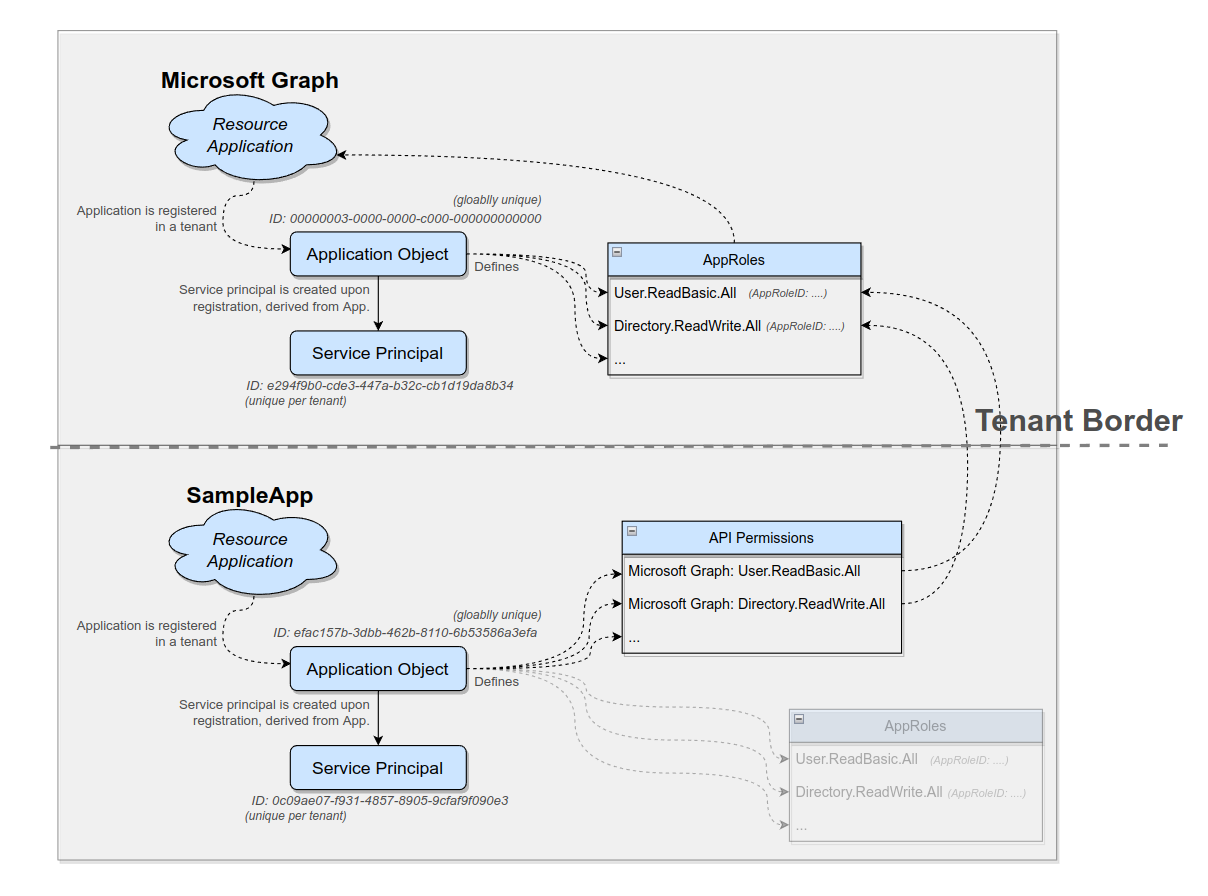
This would be a great spot to close the book, check off Azure access permissions and go for beers, but Microsoft won’t let us leave just yet as there is more to uncover…
Application and Delegated API Permissions
When defining API Permissions for our “SampleApp” - as we just did - Azure will ask us what “type” of permissions we want to set, before we can chose what (in terms of AppRoles) we want to have access to.
There are two different types of API permissions:
- Application permissions
- Delegated permissions
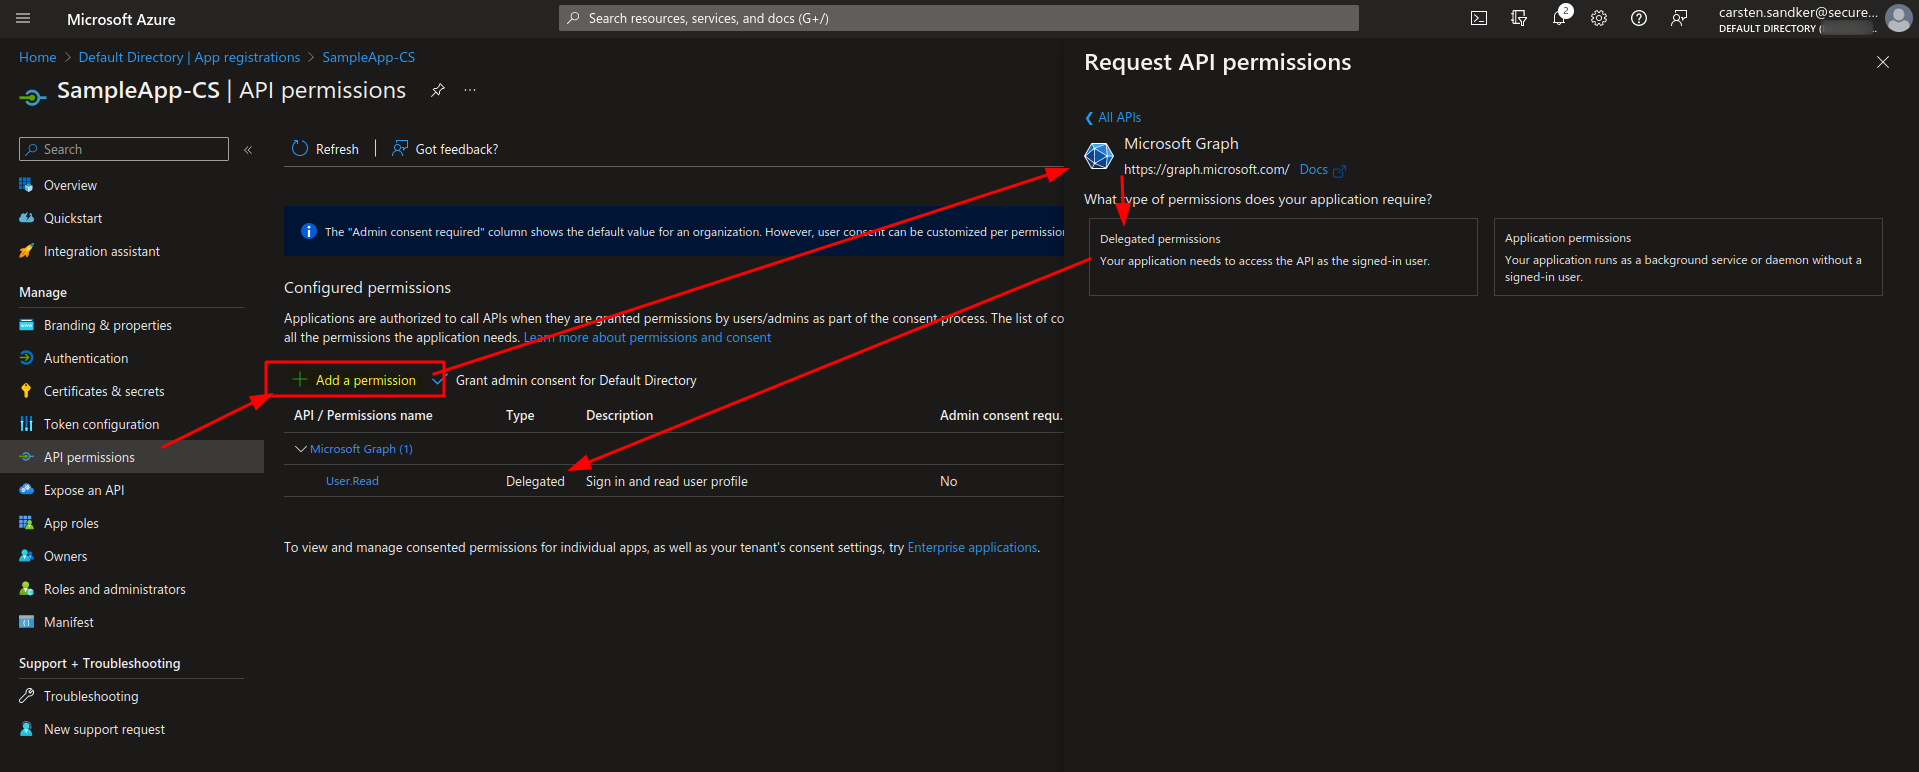
A brief explanation to what these two types is given by Microsoft in the screenshot above. I’ll try to add a bit more context to this:
Imagine our “SampleApp” would be a statistics application that shows basic user statics in our Azure dashboard, therefore our application would need to query basic user data from the Microsoft Graph API. Our application - and to be precise here: the service principal of our application - would need to directly access Microsoft Graph, saying: “Hey I’m the SampleApp I need some user data of my tenant users”. In this case we would chose “Application permissions” as our permission type, as our application (technically our application service principal) is the entity that will access the Microsoft Graph API.
To paint the opposite picture: Imagine our SampleApp to be a document storage application (like Sharepoint), that needs to read and write user (and other) data from the tenant where our application is installed. Again, we chose to query the Microsoft Graph API to retrieve or place data into the tenant, but in this case we want the access permissions to be dependent on the user that initiated an action (e.g. reading/writing a file). We don’t want that our application service principal is generally allowed to read/write all files of all users, but that the access is actually dependent on the user that uses our application (aka is logged in to our application). In Microsoft’s terminology our application should act on behalf of the logged-in user, with delegated permissions. Therefore, we choose “Delegated permissions” as our permission type for this scenario.
Knowing about these two API permission types finally completes the access picture:
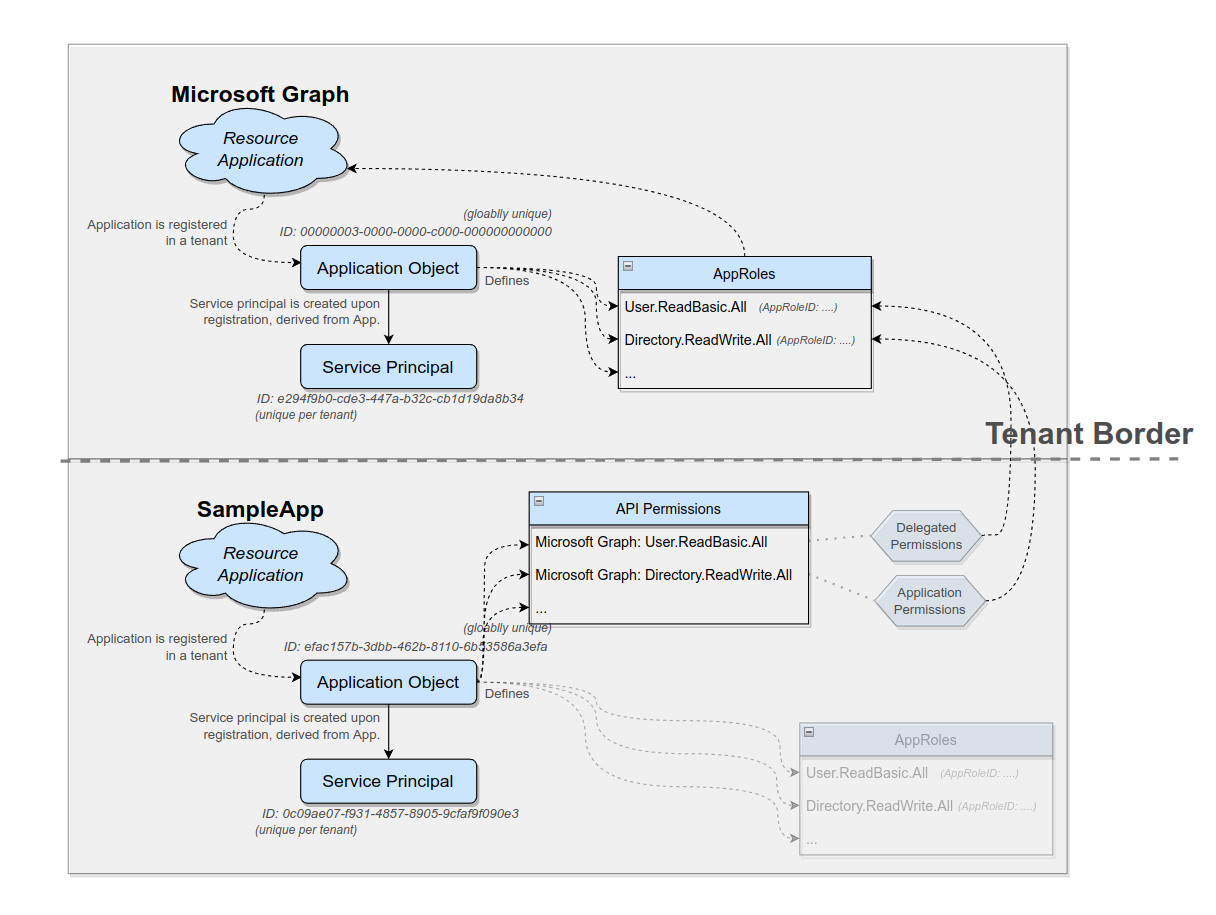
Effective Access Permissions
The concept of “Delegated access permissions” brings up a new “problem” that needs to be handled.
What if a user has been granted a permissions that does not match with the API permissions we just assigned to our application - more specifically to our application service principal.
Example: What if we assigned our application service principal “User.ReadBasic.All” permissions, but the user that is logged-in to our application is a ‘Global Administrator’ in the current tenant and would thereby have much broader permissions within the Microsoft Graph API?
In an “on-premise” Active Directory environment this problem is solved through impersonation: A service impersonates a user and thereby takes all of the users access permissions and acts towards the resource as if being the user.
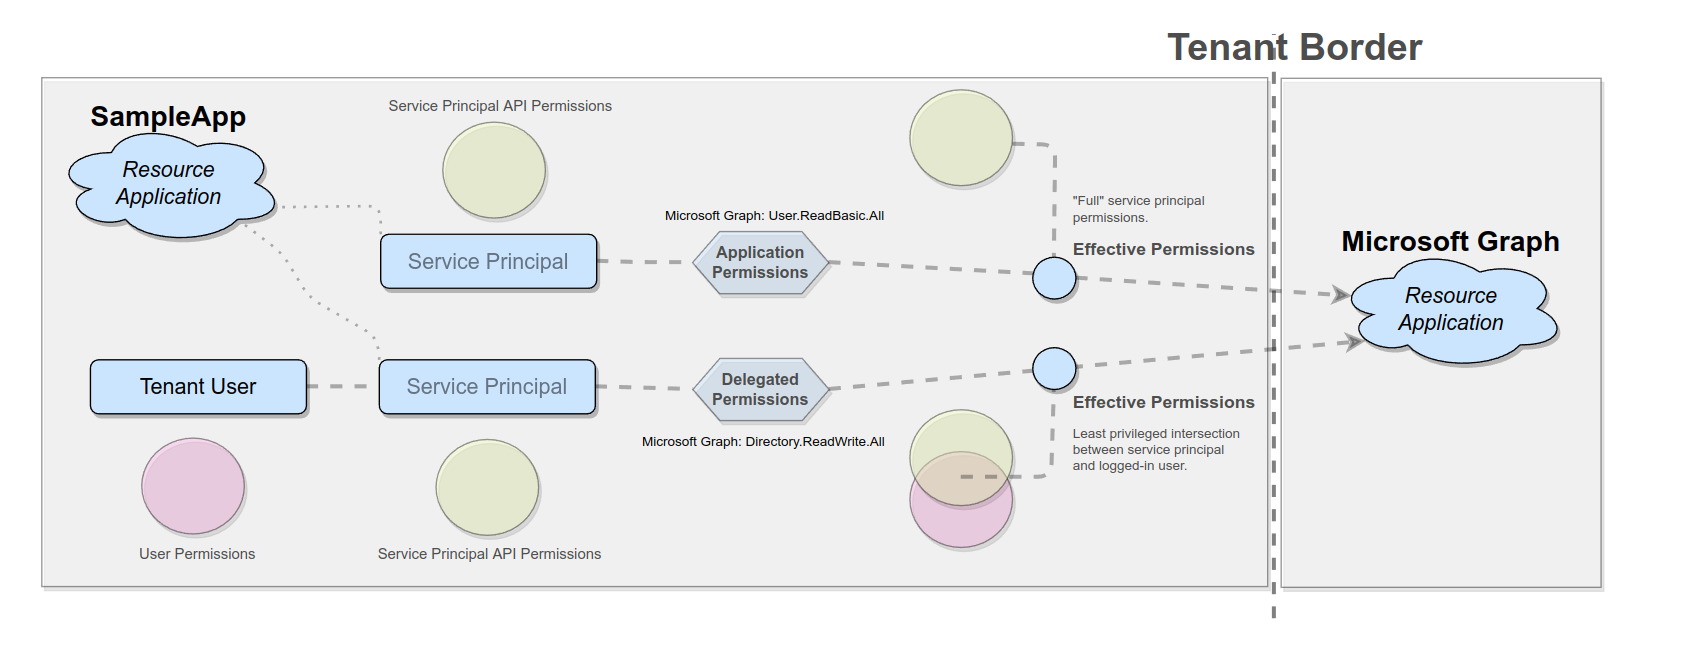
In Azure things are different. In Azure neither the user’s, nor the service principal’s access permissions take precedence, instead the least privileged intersection between those permission sets is build and access is then granted or denied based on this intersection set. This set of permissions that is finally evaluated by the resource application is what is called “effective permission”.
Okay, so when evaluating “delegated-type” permissions these resulting “effective permissions” are based on the user’s and service principal’s permissions. But what happens when evaluating “application”-type permissions?
As mentioned before “application”-type permissions define access scenarios in which there is no “logged-on” user and the service principal acts on its own. In this case the “effective permissions” are equal to the service principal’s “application”-type permissions.
The figure below tries to visualize this concept:
If you’re still puzzled on this concept and want to read this in another voice, I recommend a read through the official documentation of these concepts (there are also examples given).
Applied Scenario: Who has access to what?
To finally answer the question of “who has access to what”, let’s re-walk through our scenario from above to get an understanding of what steps are necessary for a principal to get access to a resource.
Let’s get back to where we started from: We have coded the “Microsoft Graph” resource application and are now about to add this to our Azure tenant. We log into the Azure Portal, browse to the Azure Active Directory Menu, click “App registrations”, register our app and define all the AppRoles that we need for Microsoft Graph.
At this point in time no one has access to our application, as we haven’t assigned any permissions yet, we only defined access identifiers (AppRoles) to our application.
As we clicked “Register”, our Microsoft Graph application object and the corresponding service principal have been created in our tenant. We’re now switching over to the “Enterprise applications” view, to inspect our newly created service principal.
For testing purposes we now click on “Users and Groups” and add one of our tenant users to our “enterprise application”, which technically is our service principal. The UI will ask us which user we want to select, and which (App) role we want to assign to this user. We select any random user and any sample AppRole that we created in the previous step.

This user has now been granted to access the application using the defined AppRole, the resource application (Microsoft Graph in this case) is responsible for checking this AppRole when accessing a record. In this example I created and assigned the AppRole “User.ReadBasic.All”, which - if this would be really the Microsoft Graph API - would allow the chosen user in our local tenant to access basic user information, e.g. names, from all our tenant users.
At this point in time the user shown in the screenshot above has reading access permissions to the Microsoft Graph API.
To continue experimenting we’re now switching into our seat, where we have registered our “SampleApp” application. We head over to the “App registrations” view within the Azure Portal, click on “API permissions” and add a new API permissions for our SampleApp to allow access to Microsoft Graph. We choose “application”-type permissions (as for this first case we want only the service principal to have access) and set the permission (AppRole) once again to “User.BasicRead.All”.
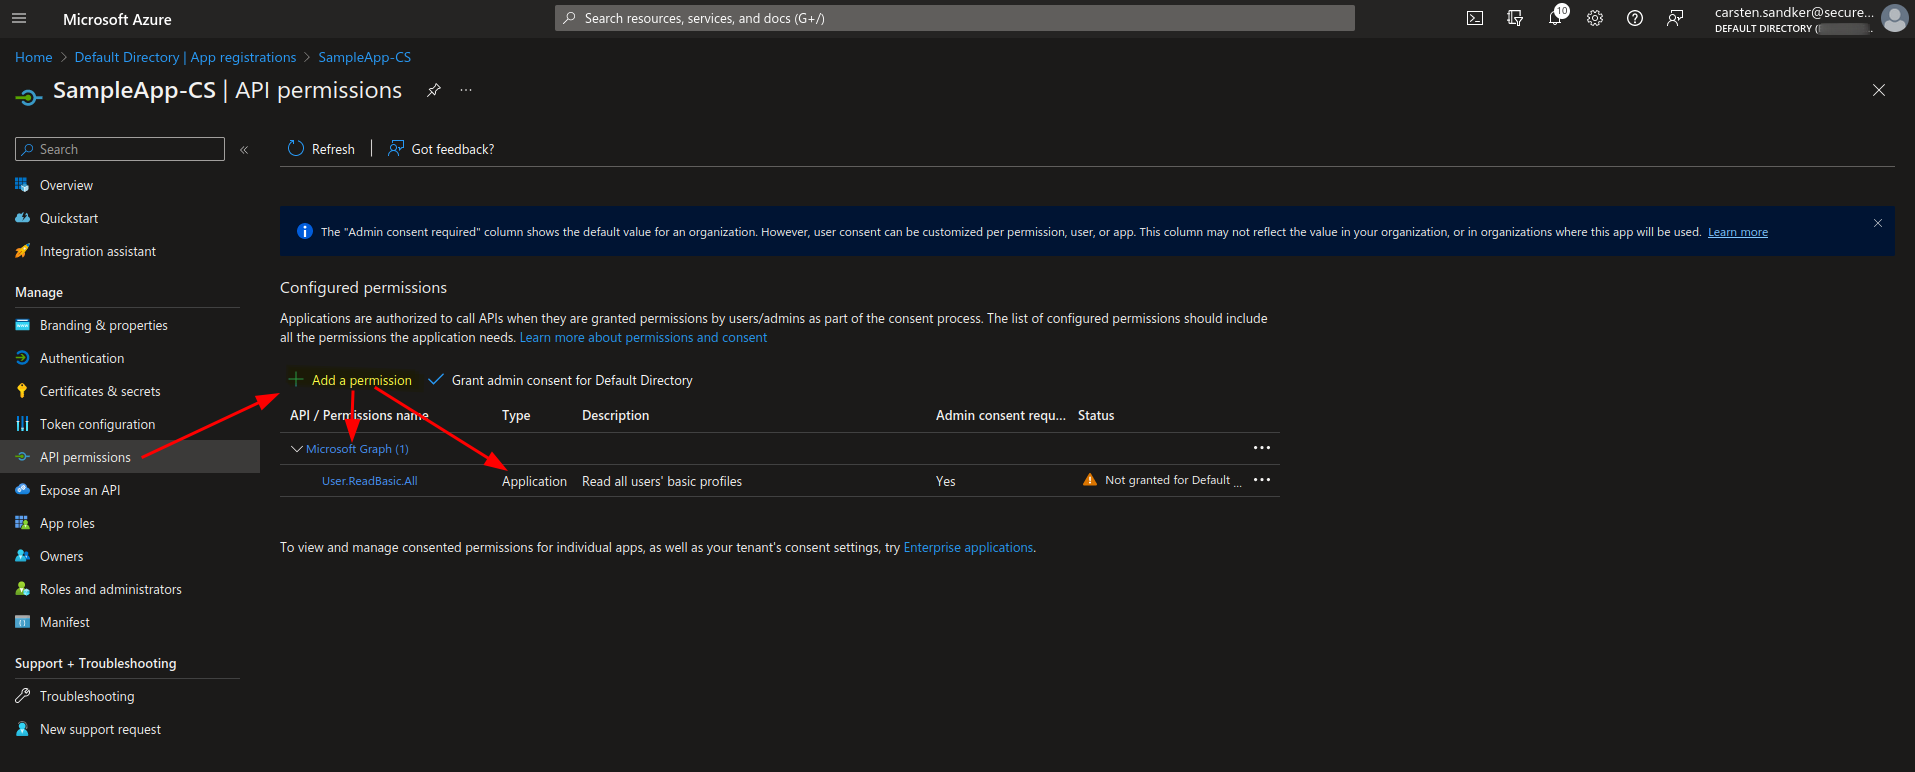
Once we click “Add permissions” the selected AppRole permissions are added for our SampleApp service principal, but as of now the service principal can’t use these permissions (yet), because for application-type permissions this AppRole requires “Admin consent”. That means an administrator has to explicitly allow this service principal to use these API permissions. Note the column that says “Admin consent required” and the orange warning sign in the status column.
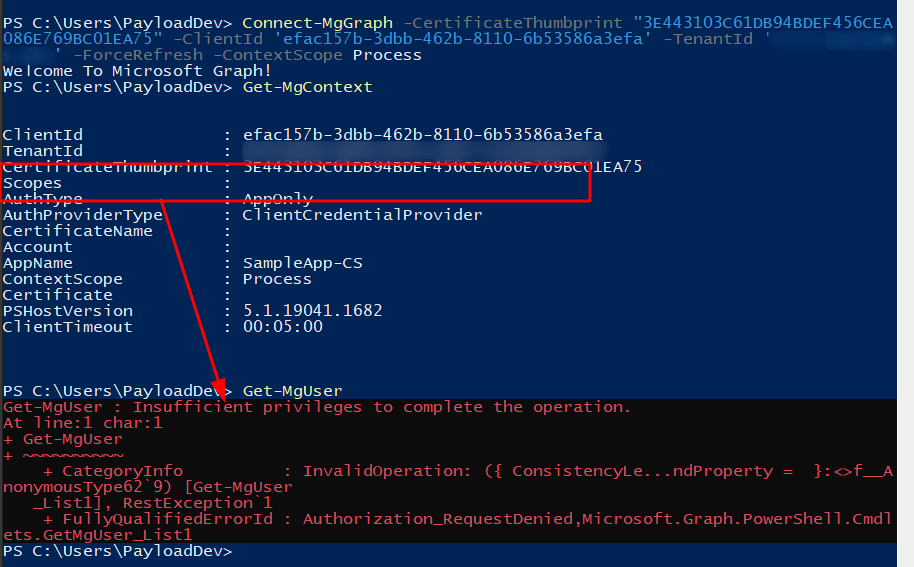
If we connect to Microsoft Graph using this service principal in the current state we will be allowed to connect, but the ‘Scope’ of our access key will be empty, which results in no permissions for our service principal.
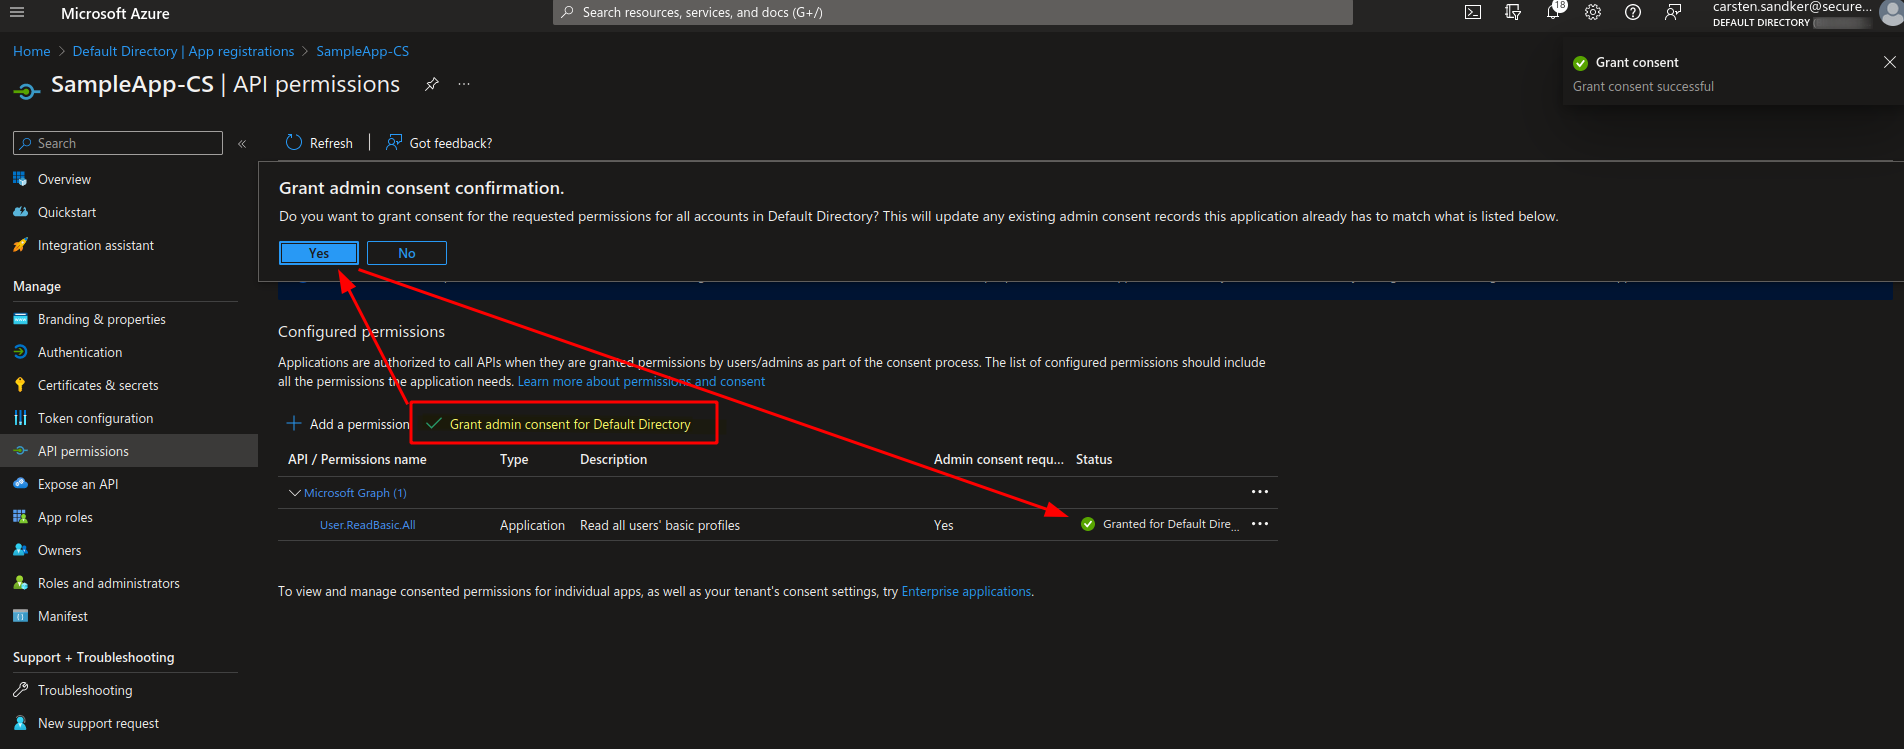
Once we grant admin consent to these permissions through the “Grant admin consent” button, the UI shows a green checkmark in the status column, indicating that our service principal now holds the permissions we specified.
Reconnecting to Microsoft Graph using PowerShell will now result in a token with the granted access permissions.
Note: I changed the AppRole here to ‘User.Read.All’ in order to be able to read all user data, just for the sake of the demo.
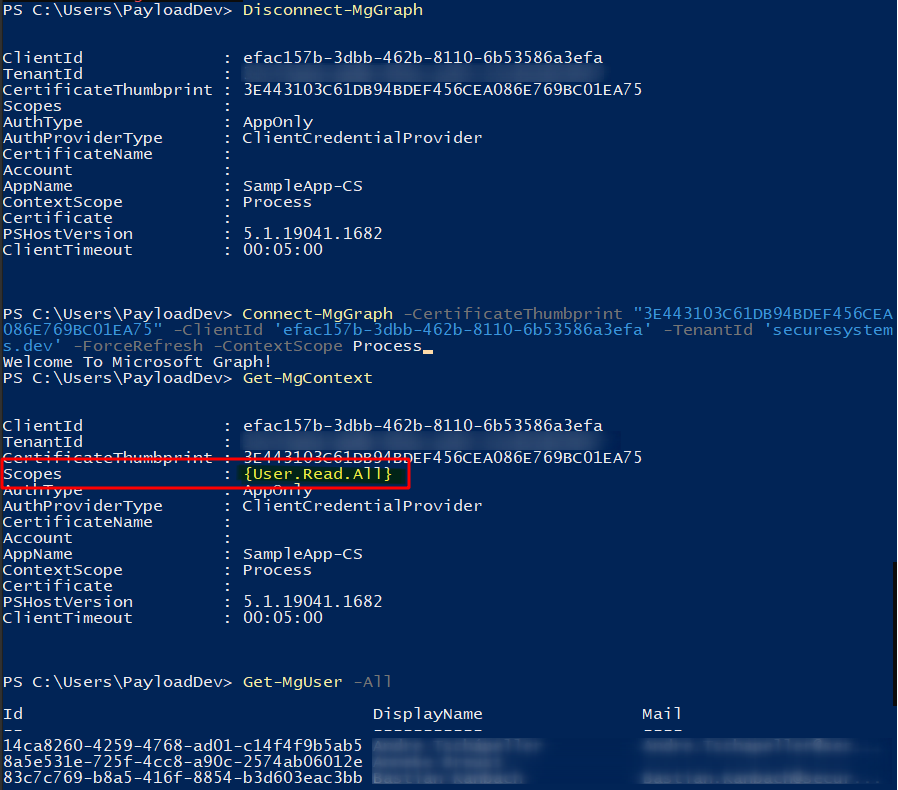
At this point in time the service principal of our SampleApp has the effective permissions to read all the data of all the users in our tenant.
Lastly, let’s remove these application-type permissions and instead set in delegated-type permission to ‘User.ReadBasic.All’:
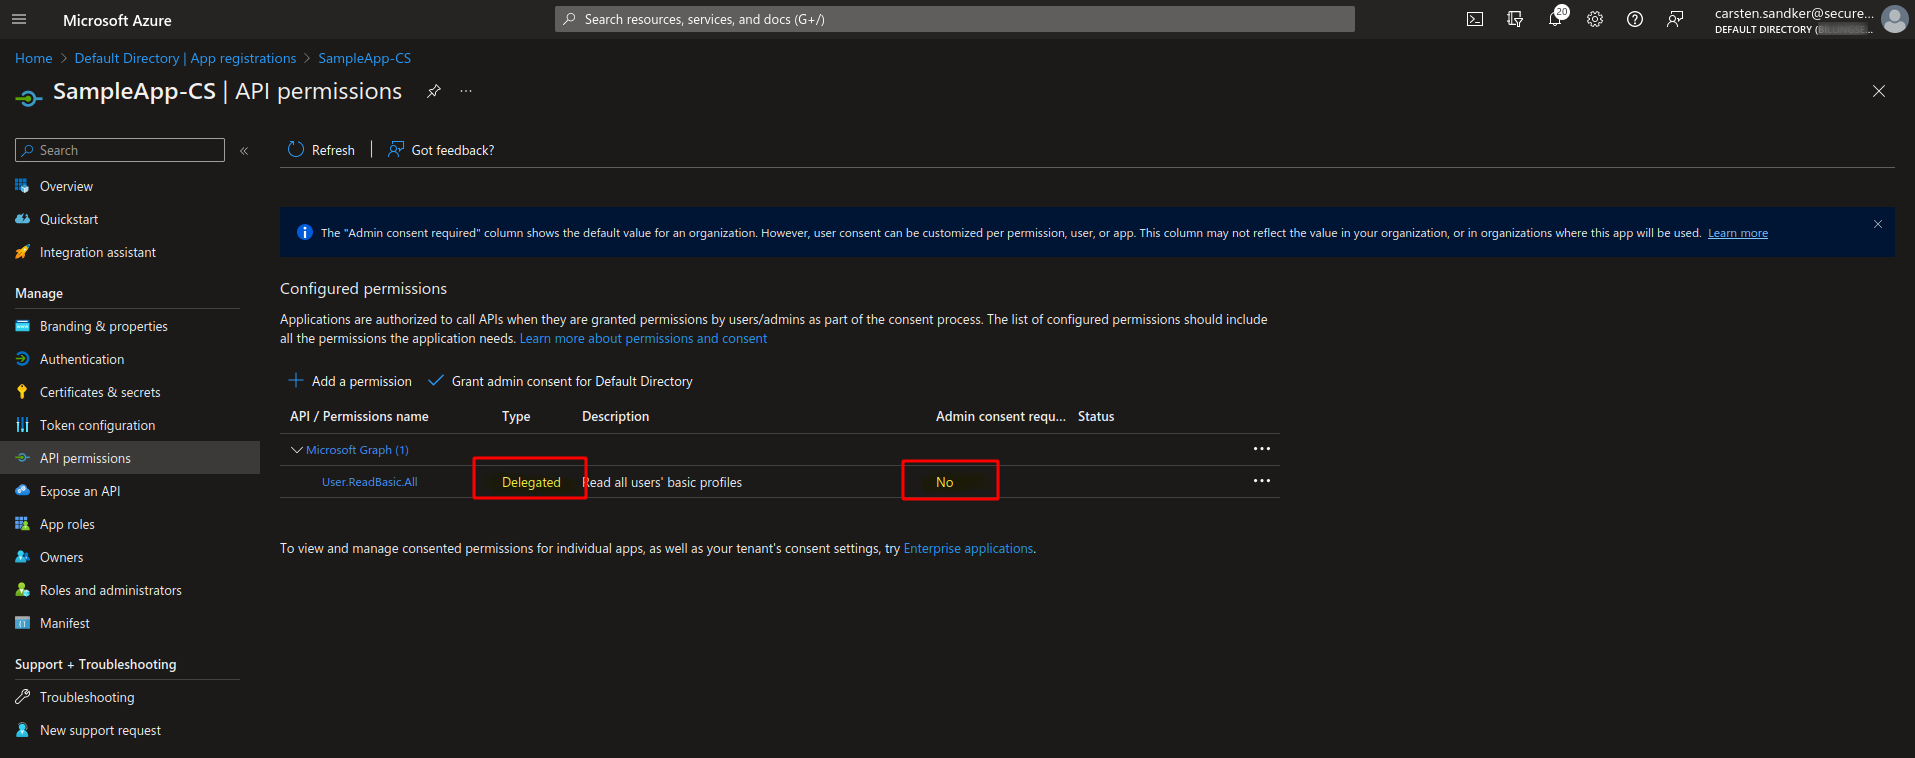
The important difference to note here is the “Delegated” keyword in the “Type” column and that no admin consent is required for this API permission. Although it is the same AppRole (‘User.ReadBasic.All’), no admin consent is needed to acquire these permissions.
At this point in time no user in our tenant has (yet) requested these permissions (and therefore no one holds these permissions), but any user could from now on.
If a user signs in to the SampleApp and attempts to access Microsoft Graph the following consent prompt will be shown to the user:
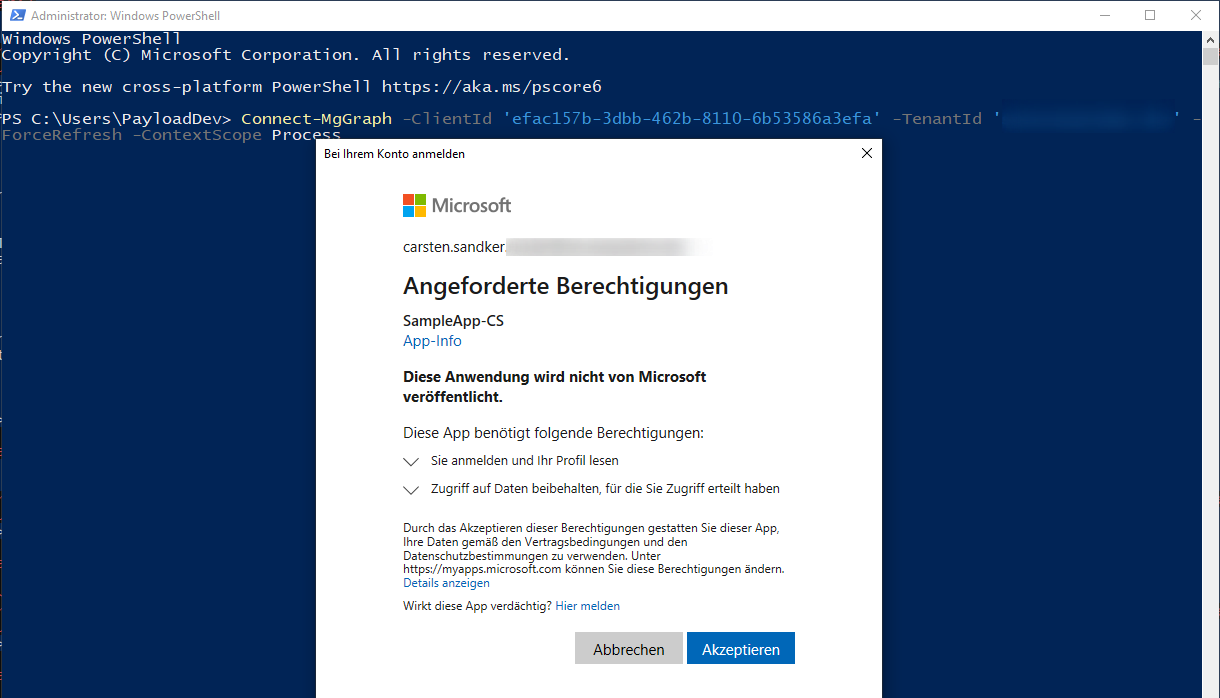
Once the user accepts these consent prompt the user has obtained the specified, delegated permissions.
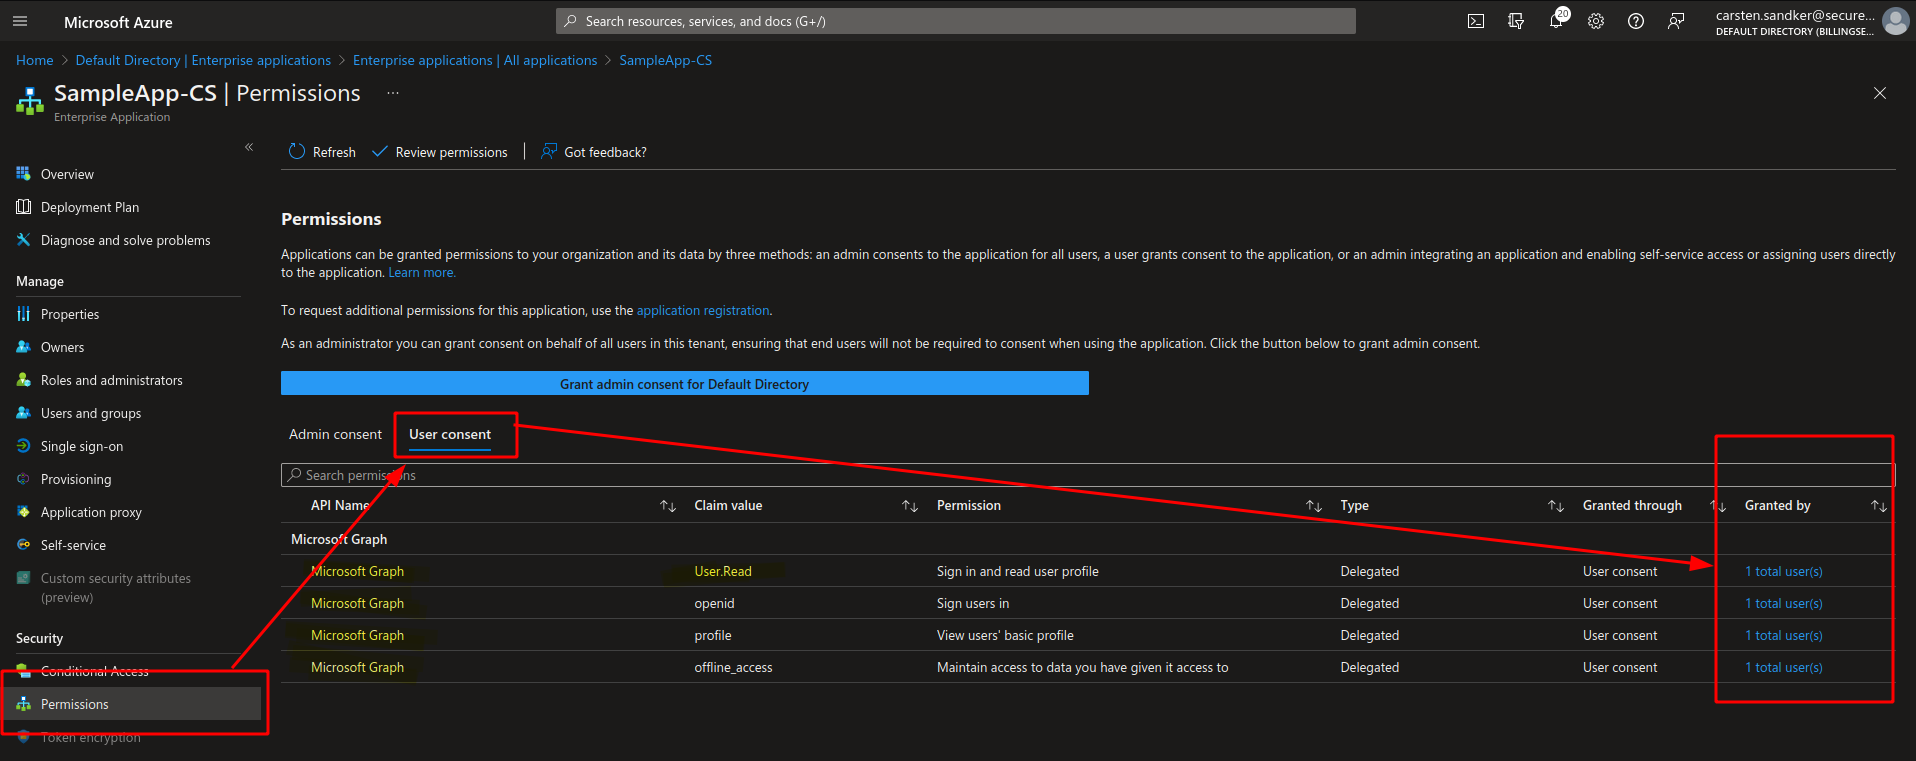
We can double check and confirm which users have obtained these permissions in the “Enterprise application” view in the Azure Portal under the “User Consent” tab within the “Permissions” menu item, as shown below:
Automation - Introducing: Azure-AccessPermissions.ps1
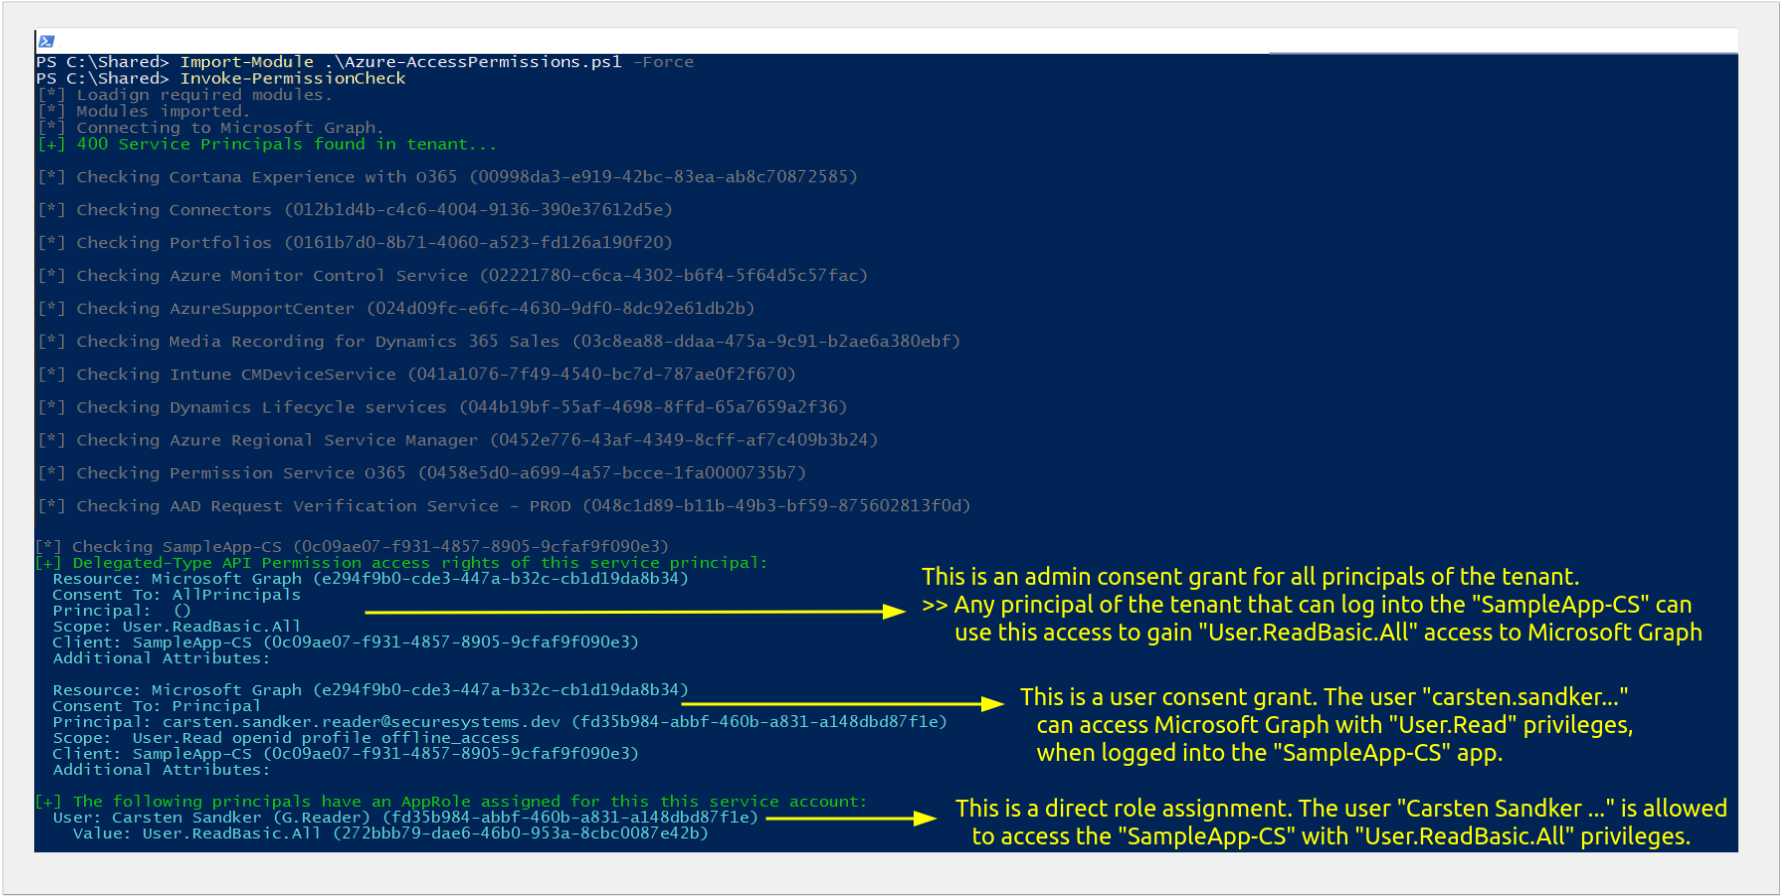
I’ve build a PowerShell script to automate the learnings from above. You can find it here.
This is what the output looks like:
