
NTLM Authentication: A Wrap Up
Contents:
This post is intended as a wrap-up to refresh/update your understanding of how the NTLM authentication scheme works in a Windows domain network.
If you want to dive heads deep into the specification and drill down on all the different messages and FLAGs, this link will lead you the MS-NLMP specification:
Basics
The Windows NTLM protocol is a challenge/response protocol, which uses pre-computed credentials (hashed user passwords) stored on a local computer to query access rights over the network.
There are two versions of this authentication scheme, NTLMv1 and NTLMv2.
NTLMv1 is pretty outdated (it was introduced in 1993) and as such you hardly find the NTLMv1 protocol used anywhere today (hopefully)
NLTMv2 is the successor of NTLMv1 and is still widely used, even in environments where Kerberos is the dominant authentication scheme. Most of the time the authentication scheme used can be downgraded from Kerberos to NTLMv2.
Workflow
An abstraction of the NTLM authentication scheme workflow is shown below:
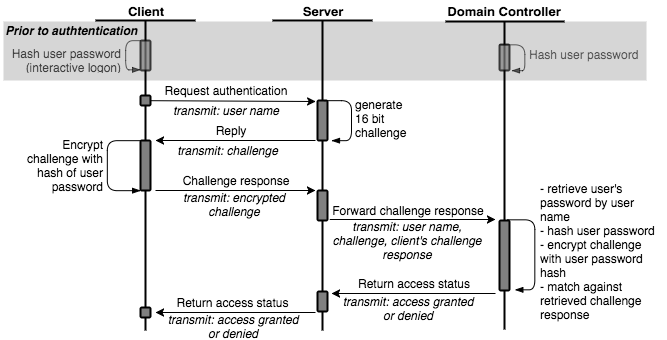
The very heart of the NTLM authentication scheme is the challenge/response mechanism, in which a random challenge is encrypted with a hash of the user’s password, who is requesting to get access to something.
So to break that down:
- The user enters his/her plain text password, e.g. to log onto a Windows machine
- This plain text password is hashed (using MD4) to create an NTLM hash
- Upon accessing a service, e.g. a network share, the service creates a challenge (a big number) and sends that challenge to the user (the client).
- The client uses the created NTLM hash to encrypt that challenge and send an encrypted blob back to the server (the response).
- The server decrypts this challenge (using the user’s known hash) and matches it against the provide plain text challenge in order to grant or deny access to the user.
Important to note at this point:
The challenge/response data transmitted over the wire does not contain the hashed user password (NTLM hash). It does contain, however, a blob that is encrypted with that hash.
So you cannot sniff the NTLM hash over the wire and match that against a rainbow table (or similar).
But you can sniff an NTLMv1 or NTLMv2 response from the wire, which also contains the plaintext challenge and use that in a brute force attack in order to crack the user’s password.
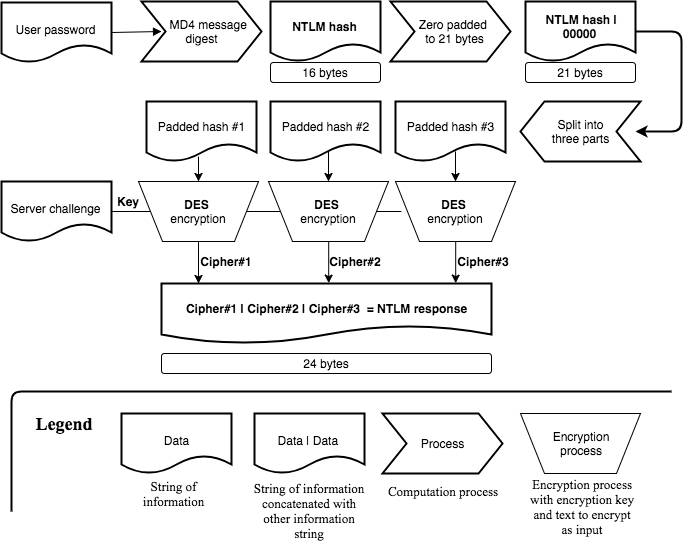
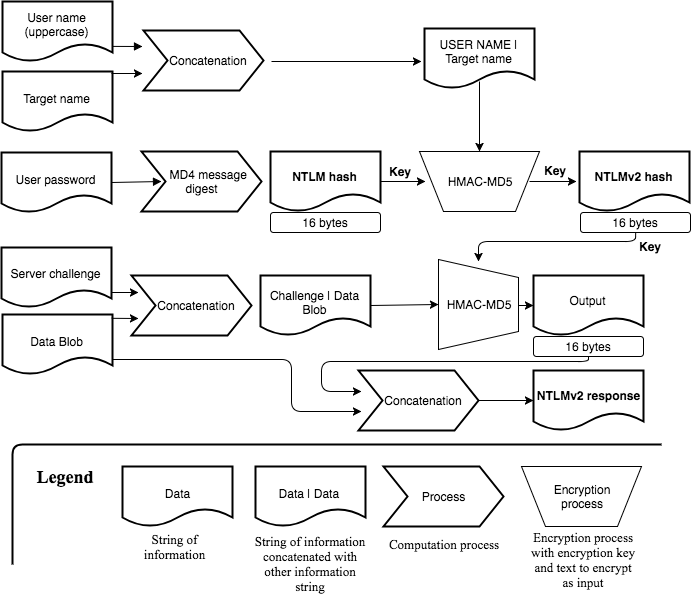
NTLM Challenge Response Computation
Before diving into the attack surface of NTLM, the computation of the NTLMv1 and NTLMv2 challenge response will help to visualize the difference between a user’s password, that user’s NTLM hash and the NTLMv1/NTLMv2 challenge response.
It is not all important to remember the whole computation chain, but spend a minute on each of the following two flow charts and get an understanding of where the user’s password gets involved, how that is used to build up the NTLM hash and finally create the challenge response.
Computation of the NTLMv1 challenge response:
Computation of the NTLMv2 challenge response:
The LM & NT Confusion
There’s one last confusion we need to resolve before jumping onto the attack surface, which is the naming and terminology thing that gets messed up often.
Say you have a user’s password.
The NTHash is the MD4 UTF-16 Little Endian hash of this password. Which you can obtain as follows:
$:> printf '%s' "HolyMolyPassword" | iconv -t utf16le | openssl md4
(stdin)= d89ba0efe6040942997f1ca0f18b933f
The LMHash calculation involves a few more steps, such as cropping the PW to 14 Chars and other not-good things (it’s old).
The NTLMHash then is simply NTHash:LMHash (note the colon).
The LMHash is defacto not existing anymore (it‘s really old and weak). Therefore what you usually see is NTHash:000000…
For that reason people tend to imply: NTHash == NTLMHash
In practice most of the time you can just go with using the NTHash (d89ba0efe6040942997f1ca0f18b933f in the example above) and pass this on (see Pass-The-Hash later on) as the LMHash is not existing anymore and components tend to ignore it.
Attack Surface
Offline Password Cracking
The hashed user password is computationally baked into the transmitted NTLM response (see computation scheme above), which enables us to break the password through offline cracking.
As outlined in the previous section the NTLMv1/NTLMv2 challenge you can sniff off the wire is not equivalent to the user’s password hash (NT hash), but you can crack NTLMv1/NTLMv2 response you sniffed from the wire.
A captured NTLMv2 response could like this:
Note the response contains the username, the realm (domain), the plaintext challenge and the encrypted challenge
Frank::LAB:fc461c4452e78a19:be9e6c888ef746f74db5b6e471158c33:0101000000000000dd8fd0173417d301adefa1c789884e5a000000000
20006004c0041004200010010004c00410042002d00440043003000310004000e006c00610062002e0063006f006d00030020004c00410042002d0
044004300300031002e006c00610062002e0063006f006d0005000e006c00610062002e0063006f006d0007000800dd8fd0173417d301060004000
2000000080030003000000000000000000000000020000023eab11131ccc0ffe09f0a6c17332e7454e49de95092e67e17b866fa583545f00a00100
00000000000000000000000000000000009002a0063006900660073002f004c00410042002d0044004300300031002e006c00610062002e0063006
f006d00000000000000000000000000
This NTLMv2 challenge response can be cracked offline, e.g. by using hashcat:
$:> hashcat-cli -a 0 -m 5600 <file_containg_hash> <CommonPasswords.list> --outfile ./cracked.txt
Other example hashes can be found at: https://hashcat.net/wiki/doku.php?id=example_hashes
Pass-The-Hash (PTH)
A user’s NTLM hash - which nowadays is equivalent to a user’s NT hash - can be used to remotely log onto Windows machines, but it all depends on who this user is and what UAC token policies are applied to the target system. Let’s approach this step by step in different scenarios…
If you got the NTLM hash (or NT hash) of a Domain Admin you can log into any domain joined machine (easy win).
If you just got the hash of a Non-Administrator Domain User, by default you’re missing access rights to log onto another machine. But if you’re for example allowed to RDP into another machine you pass-the-hash through RDP. Be aware though that a in case of a workstation a logged on user will be notified that someone is trying to log onto the computer via RDP.
If you got the NTLM hash of the Local Admin (RID 500), you can only log into a machine remotely, if your admin user is not enrolled in User Access Control (UAC), which the RID 500 admin is not by default.
To check if the admin user is enrolled in UAC, you can either go for try-and-error or check the local registry of the computer you’re trying to log on to:
C:\> reg query HKLM\SOFTWARE\Microsoft\Windows\CurrentVersion\Policies\System\
## Look for 'FilterAdministratorToken'
## '0' => Local Admin (RID 500) not enrolled in UAC (hash can be used for PTT);
## '1' => Local Admin (RID 500) enrolled in UAC
If you got the NTLM hash of a Non-RID 500 Local Admin, you can only log into a remote machine, if the LocalAccountTokenFilterPolicy is set, which is not the case by default.
This Token is used to exclude Non-RID 500 Admins from UAC, which enables them to remotely log in.
To check if this policy has been applied you can either try-and-error or check the registry again:
C:\> reg query HKLM\SOFTWARE\Microsoft\Windows\CurrentVersion\Policies\System\
## Look for 'LocalAccountTokenFilterPolicy'
## '0' => Local Admin (Non-RID 500) is enrolled in UAC (hash can not be used for PTH);
## '1' => Local Admin (Non-RID 500) is not enrolled in UAC (hash can be used)
In case you want to set the registry entry for ‘LocalAccountTokenFilterPolicy’, you can happily do that with the following call:
C:\> reg add HKEY_LOCAL_MACHINE\SOFTWARE\Microsoft\Windows\CurrentVersion\Policies\System\ /v LocalAccountTokenFilterPolicy /t REG_DWORD /d 1 /f
NTLM Relay
NTLM relay attacks are a powerful and often used way to move around and escalate privileges in a domain network.
In a relay attack the attacker relays an incoming authentication request from a victim to a target service. The whole concept of NTLM relaying is to pass on the challenge request. When a server asks you to prove your identity by encrypting a challenge you pass that challenge on and ask a victim to encrypt that same challenge for you in order to spoof its identity against the server.
At this point i’ll pass the deep dive onto @Pixis, who did a great write-up on NTLM relay here: https://en.hackndo.com/ntlm-relay/
One key part (that people tend to forget) is to be aware that not only the SMB protocol can be relayed. Other protocols, such as HTTP or LDAP are vulnerable to NTLM relay just as well.
Also important is to remember that message signing, such as in SMB signing, prevents NTLM relay attacks.
Further along a great read i can recommend to get deeper down the Relay rabbit hole is the GhostPotato write-up by at https://shenaniganslabs.io/2019/11/12/Ghost-Potato.html where also some of the history is contained.
So the basic building blocks of an NTLM relay attack are these:
- You need a user (victim) connecting to you, who will encrypt the NTM challenge(s) for you.
- You need a target service that you want to connect to using the identity of the victim
- Both victim and target must not support message signing in the protocol your relaying in (SMB, HTTP, LDAP, …))
- Finally you need some relay tooling that handles the message exchange in your relay protocol
To get started you could use the great CrackMapExec tool in order to find servers that do not support SMB signing:
$:> cme smb 10.10.10.0/24 --gen-relay-list targets.txt
Next on you could use the well-known ntlmrelayx.py tool to prepare for incoming connections, relay the authentication and execute a command on the target machine:
$:> ntlmrelayx.py –tf targets.txt –c <COMMAND>
When using ntlmrelayx.py ensure you don’t leave the target parameter (-t/-tf) empty, otherwise the NTLM connection will be relayed to where it came from and this will fail as reflective NTLM relay is fixed since Nov. 2019 - read more on the backgrounds to this at: https://shenaniganslabs.io/2019/11/12/Ghost-Potato.html
To get the last bit set, a victim that connects to you, one could utilise Responder to poison broadcast message in order to make weakly configured hosts connect back to you.
$:> Responder.py –I <Interface> -w
## Make sure you read on the different modes and settings to not screw up your network
Chaining these tools and weaknesses can enable powerful escalation and movement NTLM relay exploiting.